 Documentation
B-hyve 4-Zone Controller and Manifold Bundle Manual
The printed manuals bundled with the B-hyve 4-zone starter kit: timer installation, valve wiring and Wi-Fi setup, plus the Orbit 57253 manifold's installation, Speed-Seal wiring, testing and troubleshooting.
This page reproduces the two printed manuals that come in the B-hyve 4-zone controller and manifold bundle, English text first and the Spanish valve-system manual after it.
- User Manual of Product 1: Orbit B-hyve 4-Zone Smart Indoor Sprinkler Controller
- User Manual of Product 2: Orbit 57253 3-Valve Heavy Duty Preassembled Manifold
Product 1: B-hyve 4-Zone Smart Indoor Sprinkler Controller

Welcome to

SMART WIFI INDOOR SPRINKLER TIMER
Scan for more information

bhyve.orbitonline.com
Compatible with other B-hyve products
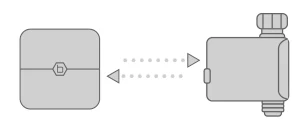
Note
Contents in the Box
- Wi-Fi Indoor Sprinkler Timer
- Screwdriver
- Mounting Screws and Anchors
- Transformer
- Quick Start Guide
- Conduit Cover
Timer Installation
Select a location
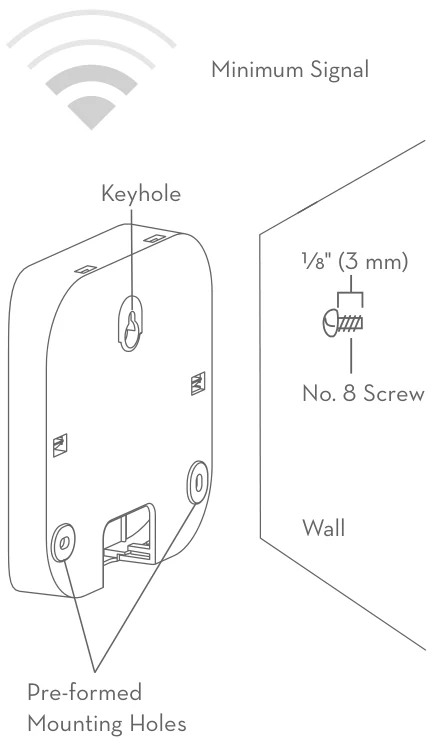
Choose a location near power and away from direct sunlight, if possible. This location should also have a good Wi-Fi signal. You can check this using a smart phone. (Find a location that has a minimum of two bars.)
Note
Mount the timer
Install a screw (included) into the wall. Use the expanding anchors (included) for plaster, masonry or drywall installations. Hang the timer on the installed screw using the keyhole slot. Level the timer and use the second screw in one of the preformed mounting holes to secure the timer.
Connect Valve Wires
Prepare wire
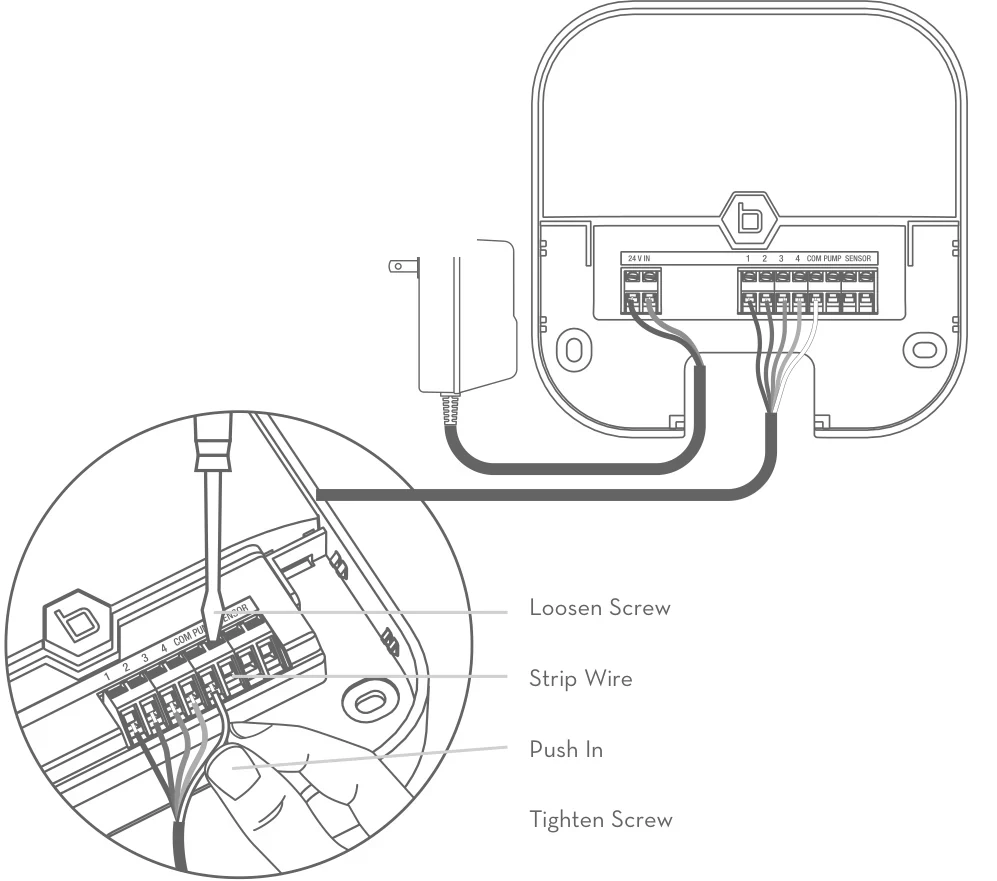
Strip 1/2" (13 mm) of insulation from each wire.
Connect wires
Attach one wire from each valve to a "Common" (COM) wire and the other wires to a numbered terminal (only one wire per terminal.)
Timer Installation–Connecting to Wi-Fi
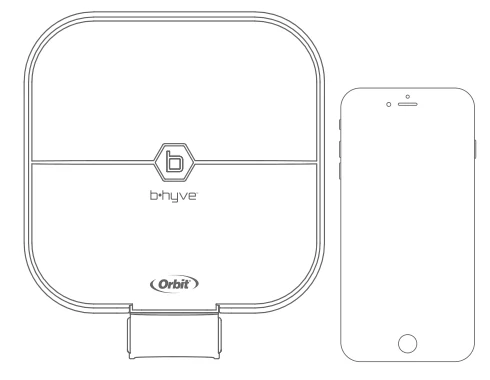
Plug in your Orbit® B-hyve™ timer
Once your B-hyve™ timer is plugged into the power source, it will automatically look to pair with your smart device. The  will begin to blink blue. This indicates that your timer is ready to pair with your smart device. Ensure that your smart device has Bluetooth® turned on.
Connect to your Orbit® B-hyve™ timer
Open your B-hyve™ app, create an account or login, and follow the step-by-step process to add and set up your device. The B-hyve™ app will connect to your device and you will, then, be guided to connect to your home Wi-Fi network.
Connect to your Wi-Fi network
Select your network from the list and enter the password for the network to connect your timer to your Wi-Fi signal. When connected, the will illuminate solid white indicating a successful pairing.
Note
Warning
Programming and Operation
Programming the timer
The app has help screens and video to assist you with Wi-Fi connections, programming, smart watering and other general questions you may have.
Note
Manual Operation
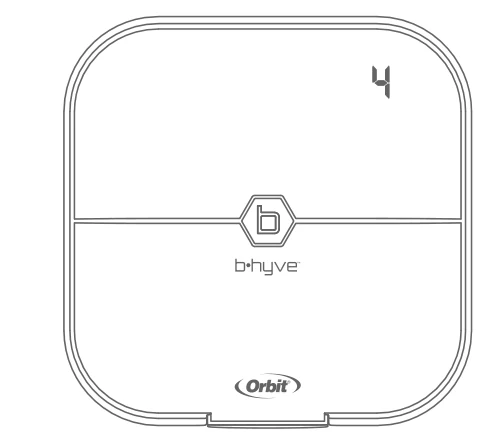
All programming and full functionality of the timer are available in the B-hyve™ app. If you have the need, there are some basic operations you can perform directly at your timer.
| Function | Button Press |
|---|---|
| MANUAL WATERING | Hold until  (water ALL stations) appears, then release. Quickly press again until desired station appears. Default watering is 10 min. per station. |
| CANCEL STATION | Press once to cancel current station. |
| RAIN DELAY | Set in app; blinks yellow and  appears. |
| ON/OFF | Hold for 10 sec. until turns white. |
| HARD RESET | Quickly press 5 times. |
The B-hyve™ App
Install the B-hyve™ app on your smart device
You will need a smart device to connect the timer to Wi-Fi.
Note
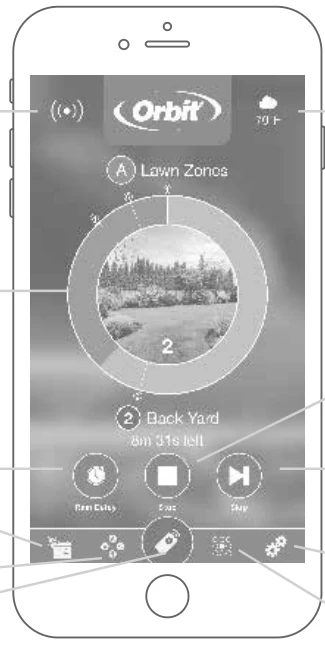
- Timer Connected Symbol
- Weather/Temp.
- Running Status/Messaging
- Stop Watering
- Rain Delay
- Next Zone
- Calendar
- Programs
- Settings
- Zone List
- Remote Control or Home Button
Specifications
| Rating | Value |
|---|---|
| Transformer ratings: Input | Australia—240V AC 50/60Hz 23W Europe—230V AC 50/60Hz 23W USA—120V AC 60Hz 23W |
| Transformer ratings: Output | 24V 750 mA |
| Timer ratings: Input/Output | AUS & EU—26V AC 750 mA 50/60 Cycle USA—24V AC 750 mA 60Hz |
| Timer Temperature Operating Range | Operating: 32-158° F (0–70° C) Storage & transport: -4–176° F (-20–80° C) |
| Timer Humidity Operating Range | Operating: 0–80% Storage & transport: 0–90% |
| Altitude | 6,500' (2,000 meters) |
| Installation Class II | Over Voltage Category II |
This timer works with any standard 24V irrigation solenoid.
The internal fuse is non-replaceable.
Help
If the app and the website don't have what you're looking for, please call our technical support line before returning this sprinkler timer to the store.
1-800-488-6156 or 1-801-299-5555
www.orbitonline.com | bhyve.orbitonline.com
FCC and IC Statement
This device complies with Part 15 of the FCC Rules and Industry Canada license exempt RSS standards. Operation is subject to the following two conditions: (1) This device may not cause harmful interference, and (2) this device must accept any interference received, including interference that may cause undesired operation.
Warning
Note
- Reorient or relocate the receiving antenna.
- Increase the separation between the equipment and the receiver.
- Connect the equipment into an outlet on a circuit different from that to which the receiver is connected.
- Consult the dealer or an experienced radio/TV technician for help.
This device meets the FCC and IC requirements for RF exposure in public or controlled environments. The end user is advised to maintain a distance of 20 cm from the controller and any personnel to ensure compliance with RF exposure regulations.
This Class B digital apparatus complies with Canadian ICES-003.
Déclaration de FCC et l'IC
Cet appareil est conforme à la section 15 de la Règlementation de la FCC et la norme RSS d'Industry Canada. Son fonctionnement est soumis aux deux conditions suivantes: (1) cet appareil ne doit pas causer d'interférences nuisibles, et (2) cet appareil doit tolérer toutes les interférences, dont les interférences pouvant causer un fonctionnement non désiré. Cet appareil numérique de classe B est conforme à la norme canadienne ICES-003.
Remarque: cet appareil été testé et déclaré conforme aux limites d'exposition pour les appareils numériques de classe B, selon la section 15 de la Règlementation de la FCC. Ces limites sont conçus pour fournir une protection raisonnable contre les interférences nuisibles dans une installation résidentielle. Cet appareil produit, utilise et peut émettre de l'énergie radio fréquence et, si elle n'est pas installée et utilisée conformément aux instructions, peut causer des interférences nuisibles aux communications radio. Cependant, il n'est pas garantie que des interférences ne se produisent pas dans une installation particulière. Si cet appareil cause des interférences gênantes à la réception d'un signal radio ou de télévision, ce qui peut être déterminé en allumant et en éteignant l'appareil, l'utilisateur peut corriger les interférences en suivants une des mesures suivantes :
- Réorientez ou repositionnez l'antenne de réception.
- Augmentez la distance entre l'appareil et le récepteur.
- Branchez l'appareil dans une prise sur un circuit différent du circuit sur lequel le récepteur est branché.
- Consulter le revendeur ou un technicien radio/TV expérimenté pour obtenir de l'aide.
Cet appareil est conforme aux exigences de la FCC et de l'IC concernant l'exposition aux ondes dans un environnement public ou contrôlé. Il est conseillé à l'utilisateur final de maintenir une distance de 20 cm du contrôleur pour assurer la conformité aux réglementations d'exposition RF. Information de conformité pour le Canada.
Product 2: Orbit 57253 3-Valve Heavy Duty Preassembled Manifold

SPRINKLER VALVE SYSTEM
INSTRUCTION MANUAL
Important Guidelines
- Warning: DO NOT use pipe dope on threads, use thread seal tape
- Place the manifold so that water drains away from the house
- If not using culinary water, install a filter upstream of the manifold
Valve Placement
Select a location for the Sprinkler Valve System with the following criteria:
- Accessible to water supply line
- Accessible to sprinkler wire from timer
- Elevated ground—avoid low areas where water will accumulate in valve box
Use a valve box (not included) to protect the sprinkler valve system
Once a location is selected, dig a hole in the ground deep enough so the top of the valve box will be flat and level with the surface.
Note
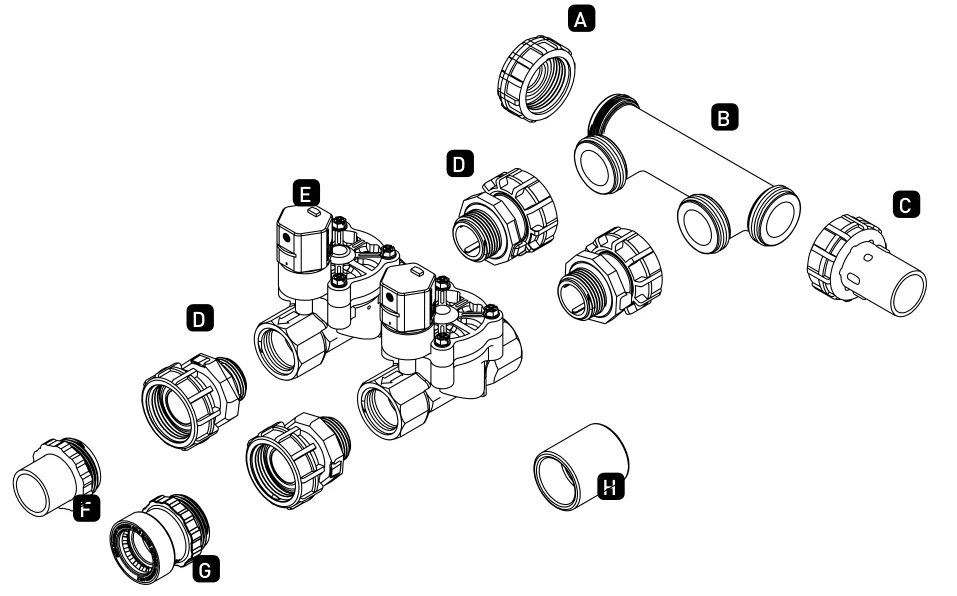
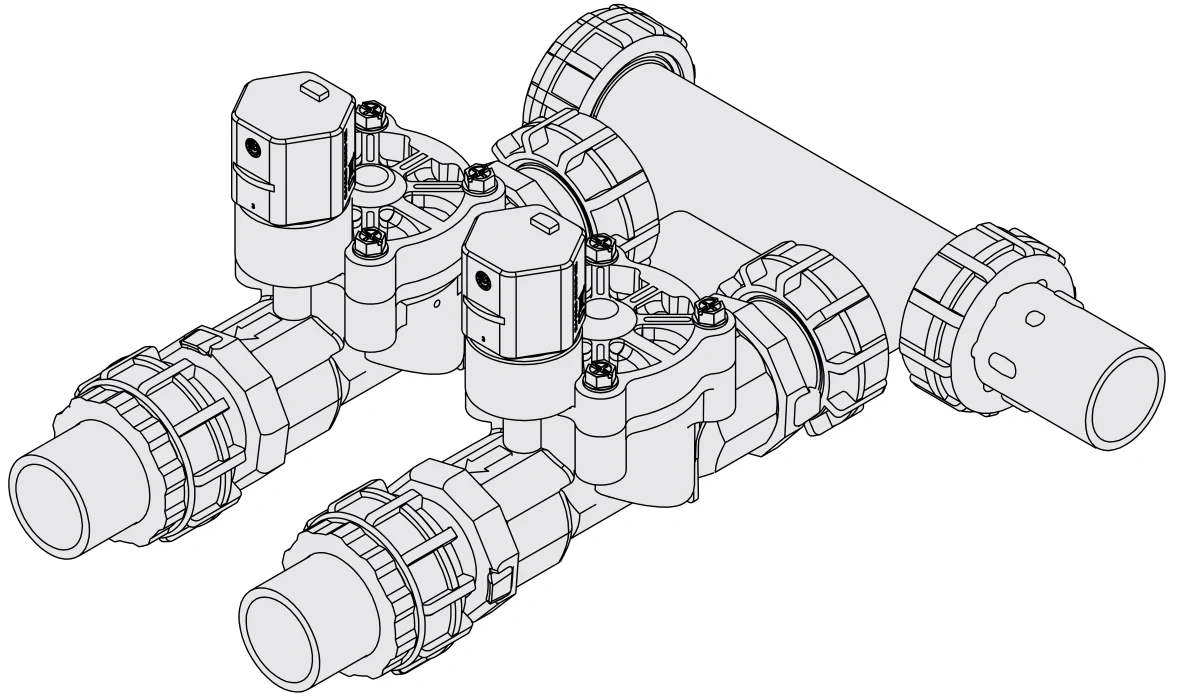
- A End Cap
- B 1, 2, or 3 Port Manifold
- C PVC Swivel Adapter (connects to sprinkler mainline)
- D 1" Swivel Adapters
- E 1" Female Thread Valve
- F PVC Transition Adapter
- G ¾" or 1" Poly Adapter (not included)
- H Coupler
Installation
Check each fitting connection to make sure it is hand-tight.
Warning
Check to make sure that the flow direction arrow (located on the body of the valve) is pointed away from the manifold
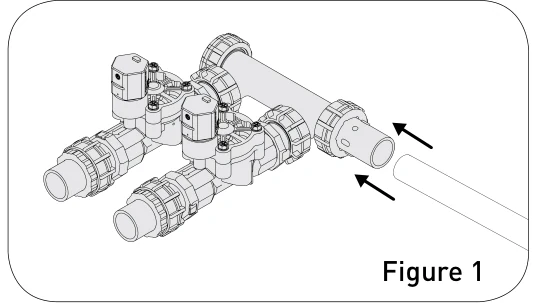
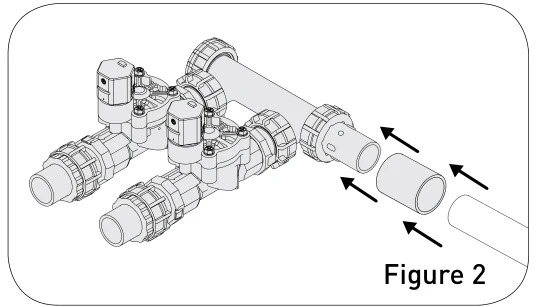
Connect the manifold to PVC mainline using PVC cement
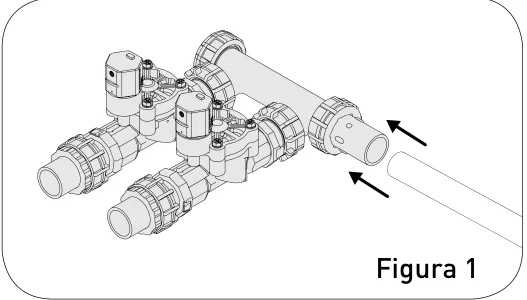
- For ¾" PVC pipe, connect directly to Swivel Adapter (C) (Figure 1)
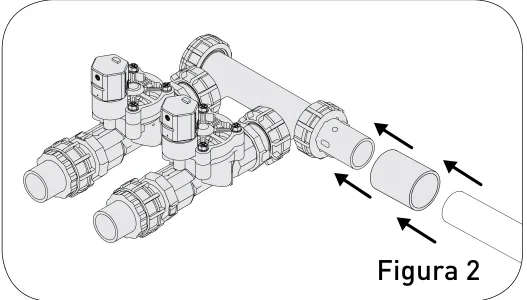
- For 1" PVC pipe, use a Coupler (H) between PVC Swivel Adapter and pipe (Figure 2)
- For larger size mainline, purchase and install reducer
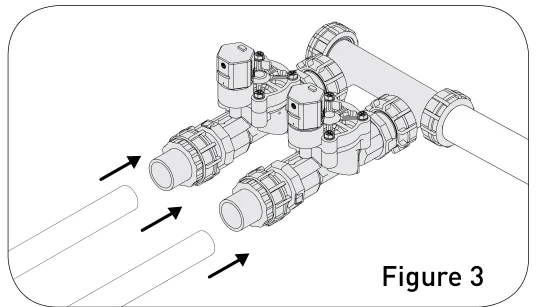
Connect your Sprinkler Valve System to your sprinkler header lines (sprinkler lines directly after the valve)
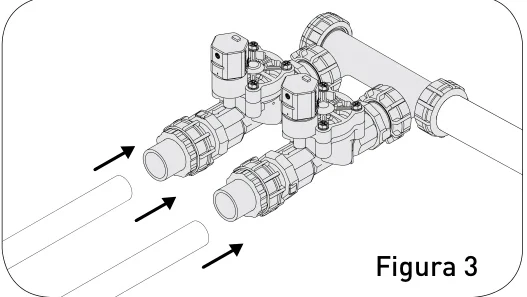
- For ¾" PVC pipe, connect directly to Transition Adapter (F) (Figure 3)
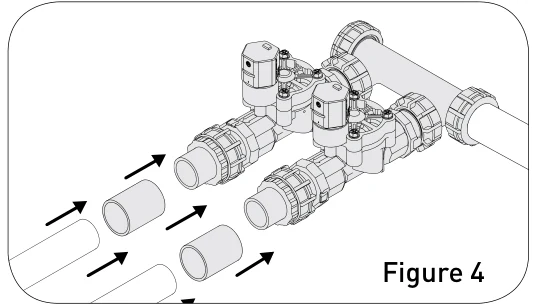
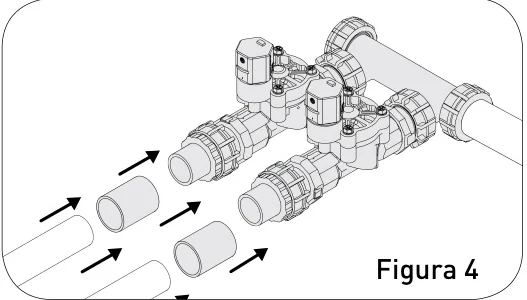
- For 1" PVC pipe, use Coupler (H) between Transition Adapter and pipe (Figure 4)
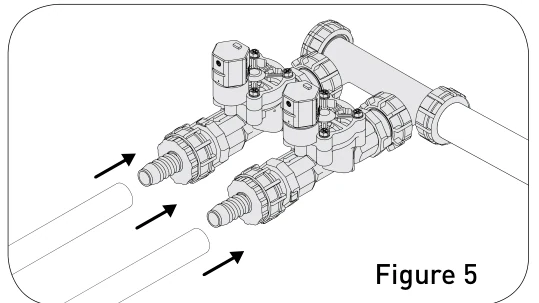
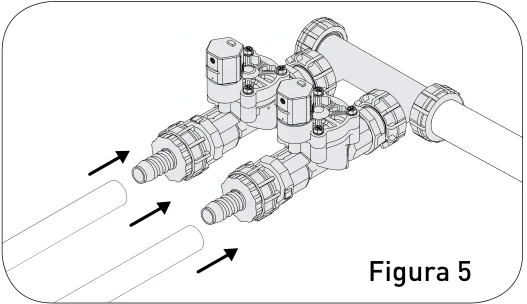
- For ¾" or 1" Poly Pipe, use Poly Adapter (included in 91207/91206) and secure with tubing clamp (Figure 5)
"Speed-Seal™" Connection
Note
Disconnect power to your sprinkler timer
Run sprinkler wire (use 16ga–20ga wire) from your timer to the manifold assembly
Remove 4"–5" of the outer insulation of the sprinkler wire
Warning
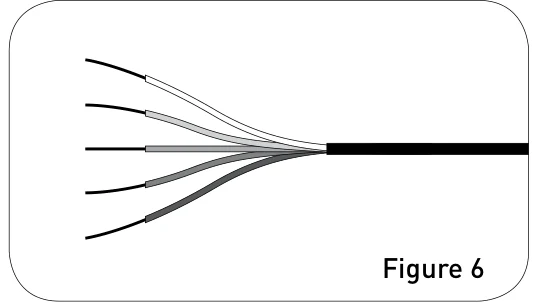
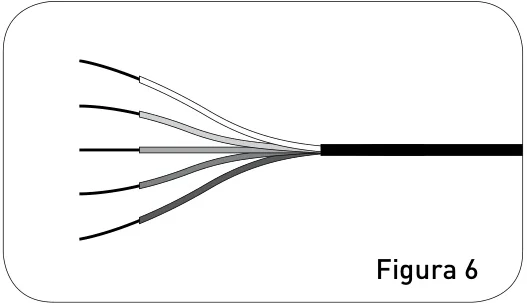
Remove 7/8"–1" of insulation from each individual wire (Figure 6)
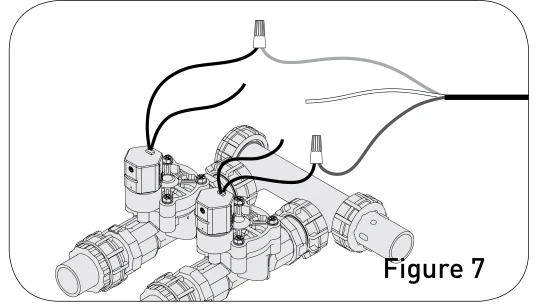
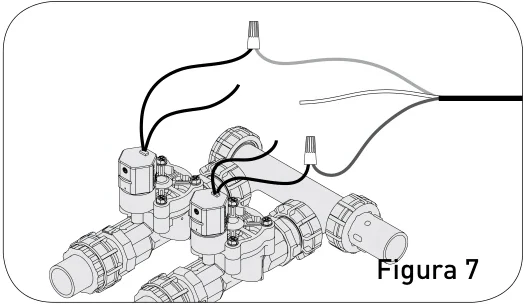
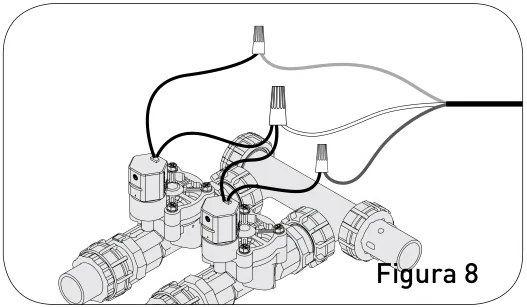
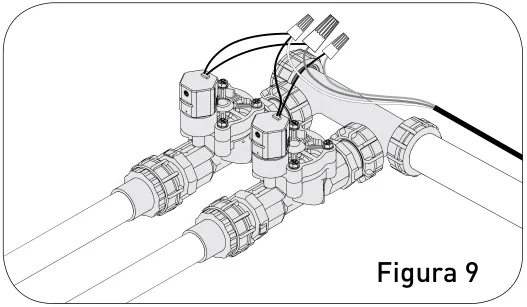
Insert one wire from the valve and a colored wire from the timer into the Speed-Seal connector nut. One wire should be used for each zone with an additional wire to be used for a common (for ease of identification, use the white wire as the common).
Note
Take the second wire from each valve and the white common wire from the timer and twist them into the wire nut provided Speed-Seal connector nuts.
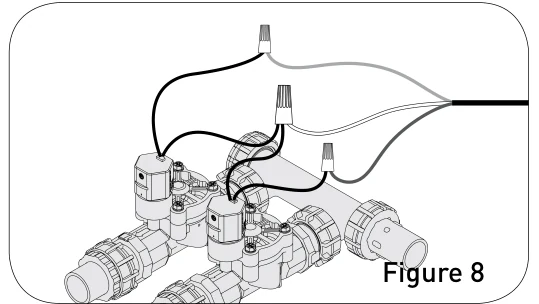
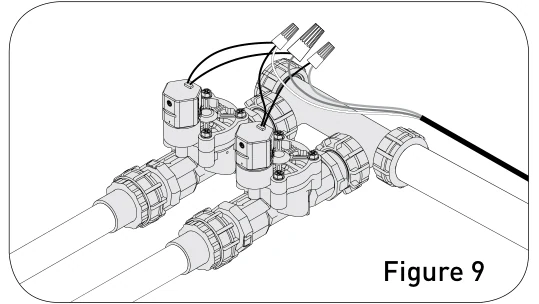
Testing
Warning
Ensure the solenoids on the valves are fully closed (turn clockwise until hand-tight).
Turn on sprinkler supply line and check manifold and valve for leaks. If any leak occurs, LIGHTLY tighten connections with channel locks until the leak stops. DO NOT over-tighten swivels.
Turn solenoid counterclockwise 1/4 turn until water flows out—run for 20 seconds and turn clockwise to retighten. Repeat with all valves.
Check that the sprinkler timer is plugged in and/or the circuit breaker is on. Run each station manually from the timer to verify electrical connection to the valve.
Troubleshooting
Manifold System leaks at connections
| Check | Solution |
|---|---|
| Connections are loose | Retighten connections |
| O-ring is out of place, damaged, or missing | Replace o-ring in proper place |
| Water pressure exceeds 80 PSI | Install a pressure regulator upstream of manifold |
The valve does not open electrically (but opens using the bleed screw) and sprinkler timer is functioning
| Check | Solution |
|---|---|
| Individual sprinkler wire pulls out easily | Untwist wires and follow Step 5 in "Speed-Seal" Connection |
| Bare individual sprinkler wire extends beyond protective membrane | Remove wire and ensure the bare wire is not shorter than 7/8" and no more than 1" in length. Untwist wires and follow Step 5 in "Speed-Seal" Connection |
| Individual Sprinkler wires are held firmly in place but are not contacting bare wire | Ensure the bare sprinkler wire is not shorter than 7/8" and no more than 1" in length. |
Orbit® Irrigation Products Inc.
North Salt Lake, Utah 84054 USA
CUSTOMER SERVICE 1-800-488-6156
Sistema de válvulas de regadores (manual en español)

SISTEMA DE VÁLVULAS DE REGADORES
MANUAL DE INSTRUCCIONES
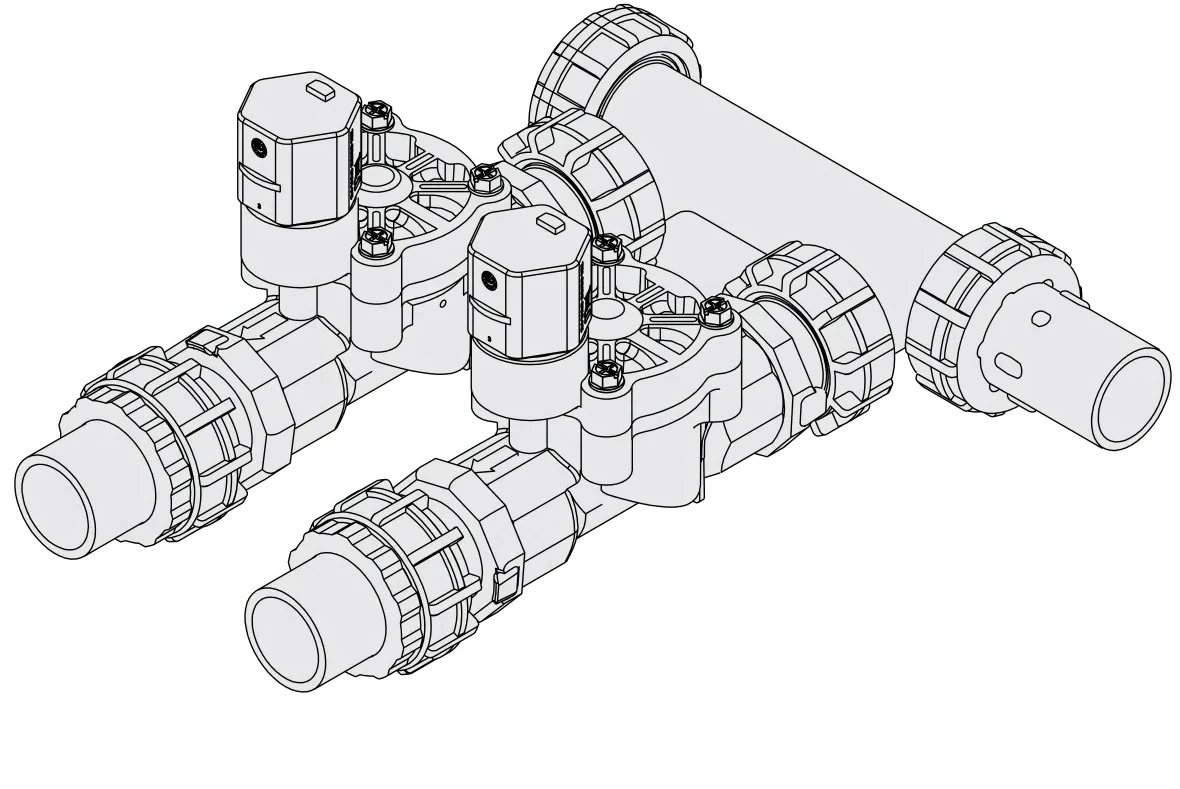
Pautas importantes
- Advertencia: NO use aditivos para tubos en las roscas; use cinta aislante.
- Coloque el tubo colector de modo que el agua escurra lejos de la casa.
- Si no va a utilizar agua potable, instale un filtro aguas arriba del tubo colector.
Colocación de la válvula
Seleccione una ubicación para el sistema de válvulas de regadores con los siguientes criterios:
- Acceso a la tubería de agua.
- Acceso al cable entre el regador y el temporizador.
- Terreno elevado: evite áreas bajas donde el agua se pueda acumular en la caja de válvulas.
Use una caja de válvulas Orbit® (no se incluye) para proteger el sistema de válvulas de regadores.
Cuando haya seleccionado la ubicación, cave un agujero en la tierra de una profundidad suficiente para que caja de válvulas quede nivelada y al ras con el terreno.
Nota
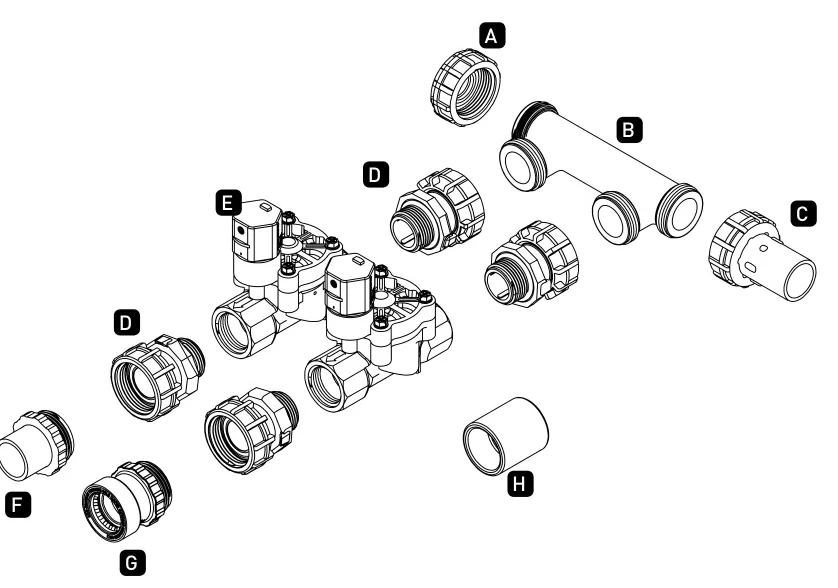
- A Tapa de extremo
- B Tubo colector de 1, 2 ó 3 puertos
- C Adaptador giratorio de PVC (se conecta a la tubería principal del regador)
- D Adaptadores giratorios de 1"
- E Válvula roscada hembra de 1"
- F Adaptador de transición de PVC
- G Adaptador de polietileno de ¾" o 1" (no se incluye)
- H Acoplador
Instalación
Asegúrese de apretar con la mano todos los conectores.
Advertencia
Compruebe que la flecha de dirección del flujo (ubicada en el cuerpo de la válvula) apunte hacia el lado opuesto al tubo colector.
Conecte el tubo colector a la tubería principal de PVC con cemento PVC.
- Si el tubo de PVC es de ¾", conéctelo directamente al Adaptador giratorio (C) (Figura 1).
- Si el tubo de PVC es de 1", conéctelo al adaptador giratorio de PVC mediante un acoplador (H) (Figura 2).
- Si el tubo es más grande, utilice reductores (no incluidos).
Conecte el sistema de válvulas de regadores a las tuberías principales del regador (las tuberías del regador que están directamente después de la válvula).
- Si el tubo de PVC es de ¾", conéctelo directamente al Adaptador de transición (F) (Figura 3).
- Si el tubo de PVC es de 1", conéctelo al adaptador de transición mediante un acoplador (H) (Figura 4).
- Si es un tubo de polietileno de ¾" o 1", utilice un adaptador de polietileno (incluido en los modelos 91207/91206) y asegúrelo con una abrazadera para tubería (Figura 5).
Conexión "Speed-Seal™"
Nota
Desconecte el temporizador de regadores de la alimentación eléctrica.
Pase el conductor del regador (use conductor de calibre 16 a 20) desde el temporizador hasta el conjunto del tubo colector.
Retire de 10,2 a 12,7 cm de aislante externo del cable del regador.
Advertencia
Retire de 2,2 a 2,5 cm de aislante de cada conductor (Figura 6).
Inserte un cable de la válvula y un cable de color del temporizador en la tuerca del conector Speed-Seal. Se debe utilizar un cable para cada zona con un cable adicional que se debe usar como cable común (para facilitar la identificación, use el cable blanco como el común).
Nota
Tome el segundo cable de cada válvula y el cable blanco común del temporizador y tuérzalos en el empalme para cables que se proporciona con las tuercas del conector Speed-Seal.
Prueba
Advertencia
Asegúrese de que los selenoides en las válvulas estén completamente cerrados (apriételos con la mano girándolos en dirección de las manecillas del reloj).
Abra la tubería de suministro del regador y revise si hay fugas en el tubo colector o en la válvula. Si hay fugas, utilice un alicate para filtros para apretar SUAVEMENTE las conexiones hasta que la fuga se detenga. NO apriete demasiado las conexiones.
Gire los solenoides un cuarto de vuelta en dirección de las manecillas del reloj hasta que el agua fluya; déjela correr por 20 segundos y gírelo en dirección de las manecillas del reloj para volver a apretarlo. Repita el procedimiento con todas las válvulas.
Verifique que el temporizador del regador esté conectado y que el interruptor de circuito esté encendido. Active manualmente cada estación desde el temporizador para comprobar la conexión eléctrica hacia la válvula.
Solución de problemas
El sistema del tubo colector tiene fugas en las conexiones
| Revise | Solución |
|---|---|
| Las conexiones están sueltas | Vuelva a apretar las conexiones |
| La junta tórica está dañada, en posición incorrecta o no está | Ponga la junta tórica en su lugar nuevamente |
| La presión de agua supera los 80 PSI | Instale un regulador de presión aguas arriba del tubo colector |
La válvula no se abre eléctricamente (pero se abre utilizando el tornillo de purga) y el temporizador del regador está funcionando
| Revise | Solución |
|---|---|
| El conductor de cada regador se sale con facilidad | Separe los conductores y proceda con el paso 5 en Conexión "Speed-Seal". |
| Los conductores pelados individuales del regador se extienden hasta más allá de la membrana protectora | Retire el conductor y asegúrese de que el conductor pelado tenga una longitud mínima de 2,2 cm y máxima de 2,5 cm. Separe los conductores y proceda con el paso 5 en Conexión "Speed-Seal". |
| Los conductores de cada regador están firmes en su lugar pero no tienen contacto con los conductores pelados | Asegúrese de que el conductor pelado del regador tenga una longitud mínima de 2,2 cm y máxima de 2,5 cm |
Orbit® Irrigation Products Inc.
North Salt Lake, Utah 84054 USA
CUSTOMER SERVICE 1-800-488-6156
Related guides
B-hyve XR 57985 Smart Wi-Fi Sprinkler Timer User Guide
The printed B-hyve XR 57985 user guide: choosing a mounting location, wiring valves, pairing over Wi-Fi, manual operation, specifications and the FCC statement.
B-hyve Gen 1 Hose Faucet Timer User Guide
How to set up the B-hyve Smart Hose Faucet Timer with Wi-Fi Hub, water manually, read the timer and hub LED lights, and check specifications and warranty.