 Documentation
B-hyve 57946 / 57950 Smart Wi-Fi Sprinkler Timer User Manual
Orbit® B-hyve™ user manual for the 57946 and 57950 smart Wi-Fi sprinkler timers, covering installation, valve wiring, dial programming, additional features, reference terms, and troubleshooting.

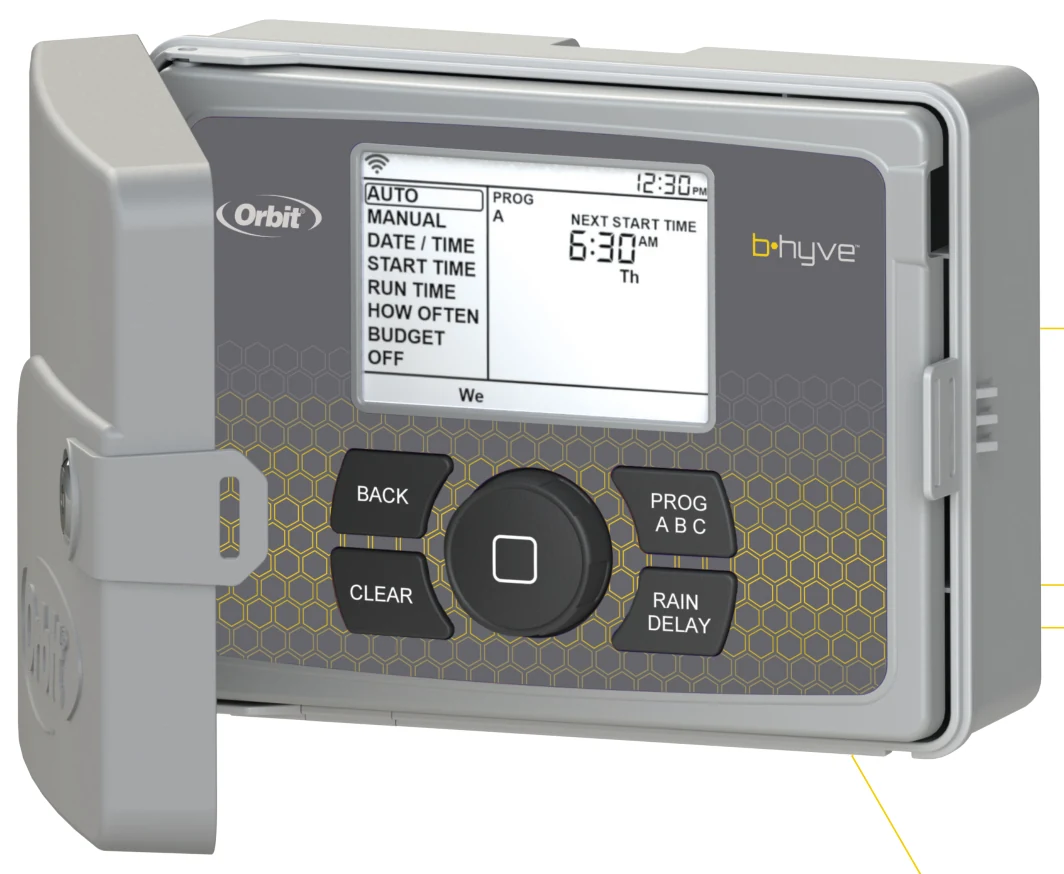
Users Manual
Sp. Users Manual
57946-24 rA
Congratulations on selecting your new Orbit® timer! Orbit’s simple programming and setup are combined with the latest timer technology and versatility. Your new timer provides convenience and flexibility, letting you run a fully automatic, a semi-automatic, or a manual watering program for all your watering needs.
Although this timer is so easy to program that you likely will not need instructions, we recommend that you read this manual fully before installation so that you understand all of the advanced features.
Table of Contents
- Section 1: Get to know your timer — page 4
- Section 2: Installation — page 6
- Section 3: Programming — page 8
- Section 4: Additional Features — page 10
- Section 5: Reference — page 13
Section 1: Get To Know Your Timer
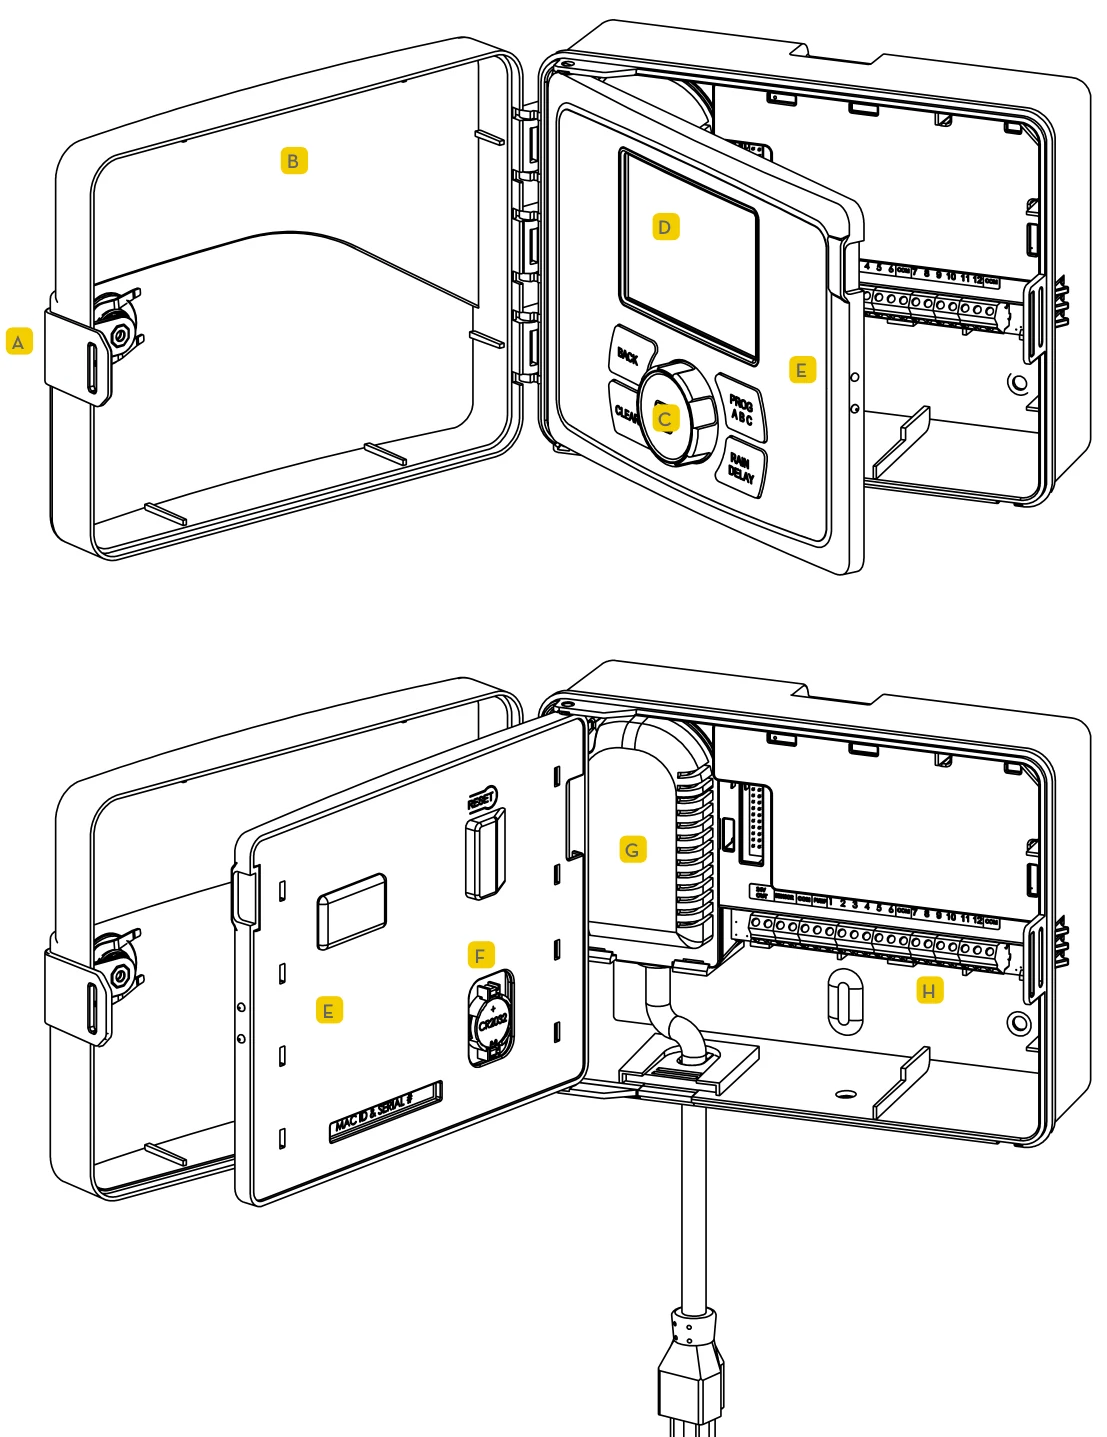
| Label | Part |
|---|---|
| A | Lock and Latch |
| B | Weather Resistant Cover |
| C | Dial |
| D | Digital Display |
| E | Swing Door Panel |
| F | Battery Compartment |
| G | Transformer |
| H | Wiring Terminals |
Buttons
| Buttons | Function |
|---|---|
 Dial | Scroll up or down, left or right and push to make a selection |
| CLEAR | To clear a setting |
| PROGRAM | To move to different programs: A, B, and C |
| BACK | To go back a step |
| RAIN DELAY | To pause operation for 24-72 hours due to rain or other factors |
Dial Position
| Dial Position | Function |
|---|---|
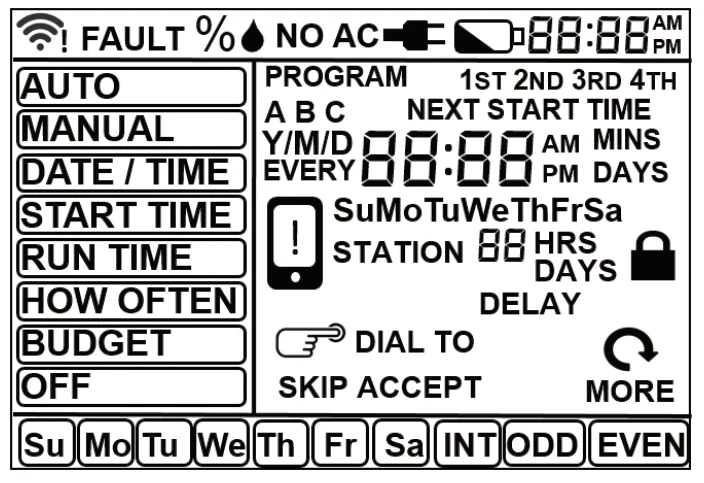
| AUTO | Set program is running |
 MANUAL | To water stations manually |
 DATE/TIME | Set clock time, Year, Month, and Day |
 START TIME | Set time to begin watering Year, Month & Day |
 RUN TIME | Set watering duration for each station |
 HOW OFTEN | Set frequency of watering days |
 BUDGET | Adjust overall watering as a percentage |
 OFF | Turn all stations/functions off |
Section 2: Installation
Required Tools
- Small Flathead Screwdriver (included in hardware package)
- Wire Strippers
Installation Steps
- Select a Location
- Mount the Timer
- Connect Valve Wires to Timer
- Connect Electrical Power
- Activate Battery
1. Select a Location
When choosing a location for your timer, consider the following:
- Choose location near an electrical outlet.
- Ensure operating temperatures are not below 32° or above 158° Fahrenheit (below 0° Celsius or above 70° Celsius).
- Place it away from direct sunlight if possible.
- Ensure at least 9” of space to the left of the sprinkler timer box for the door to swing open after installation.
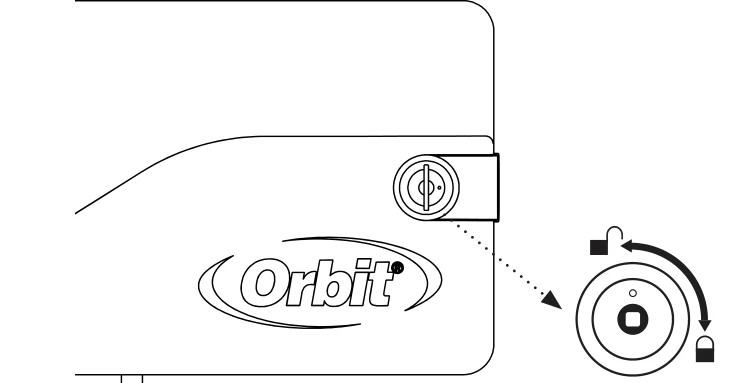
- Locate the timer where there is easy access to sprinkler wire (from valves). If mounted in an outdoor location, shut the compartment door to keep the timer safe from weather damage. To lock: insert the key and turn clockwise to the locked position.
Note
Note: Sprinkler timers are weather-resistant to UL-50 and ETL® Listings, but should not be placed in areas where continuous water could cause damage.
2. Mount the Timer
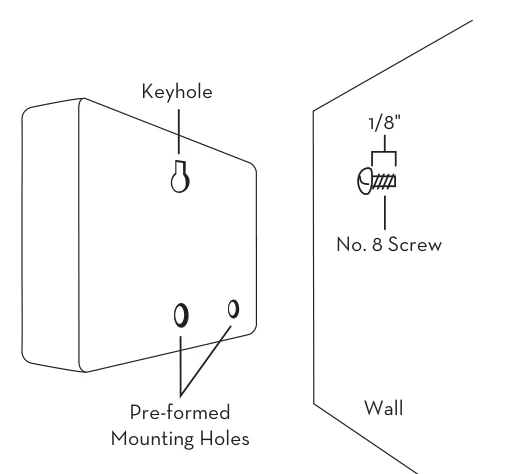
- Install a No. 8 screw (included) into wall. Leave the screw head protruding 1/8” (3mm) from wall. Use expanding anchors (included) in plaster or masonry, if necessary, for a secure hold.
- Slip the timer over protruding screw (using keyhole slot in back of timer). See figure 2
- Drive a No. 8 screw through one of the two pre-formed holes located in lower back cabinet.
3. Connect Valve Wires to Timer
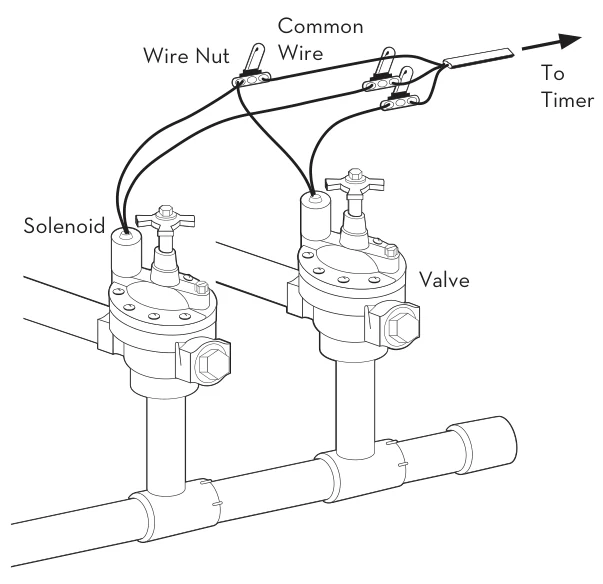
- Strip 1/2” (12 mm) of the plastic insulation off the end of each wire for both the timer wires and the valve wires.
- Connect one wire from each valve (it doesn’t matter which wire) to a single “Common” sprinkler wire (usually white).
- Connect the remaining wire from each valve to a separate colored sprinkler wire.
Note
Note: The maximum loading for each station/pump is 250mA, the maximum loading for the timer is 500mA.
If the distance between the sprinkler timer and valves is under 700’ (210 m), use Orbit® sprinkler wire or 20 gauge (AWG) plastic jacketed thermostat wire to connect the sprinkler timer to the valves. If the distance is over 700’ (210 m), use 16 gauge (AWG) wire.
Important
Important: All wires should be joined together using wire nuts, solder, and/or vinyl tape. In wet environments like a valve box it is recommended to use Orbit Grease Caps to prevent corrosion of the connection and for protection from water infiltration.
Wiring Electric Valves
Strip 1/2” (12 mm) of plastic insulation off the end of each individual wire. Each valve has two wires. One wire (it doesn’t matter which one) is to be connected as the common. The other valve wire is to be connected to the specific station wire that will control that valve. The common wires for all the valves can be connected together to one common wire going to the controller. To avoid electrical hazards, only one valve should be connected to each station.
Important
Important: The wire can be buried in the ground; however, for more protection wires can be pulled through PVC pipe and buried underground. Be careful to avoid burying the wires in locations where they could be damaged by digging or trenching in the future.
Your timer is equipped with angled terminals for easy wire insertion. Push common wire into the common terminal and, using the included screwdriver, tighten the screw in the wire terminal to secure the wire. Insert and tighten remaining wires to corresponding terminal locations.
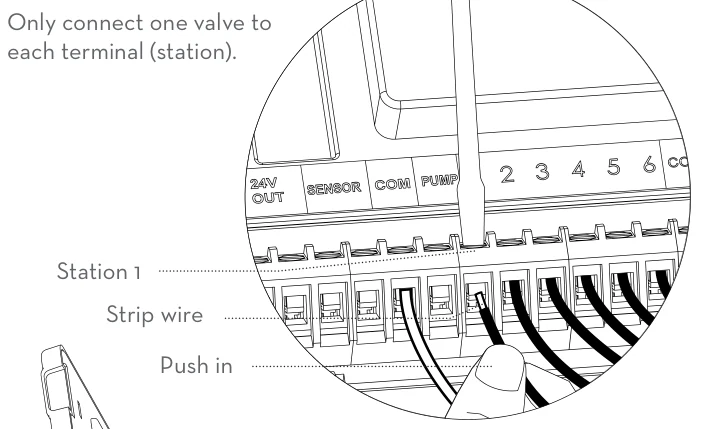
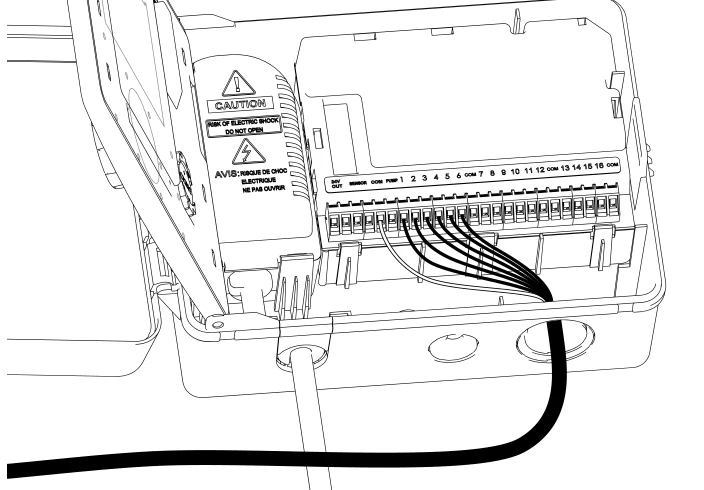
4. Connect Electrical Power
Indoor Locations – Insert the power cord into an 110V electrical outlet.
Outdoor Locations – Insert the power cord into a 110 volt Ground Fault Interrupter (GFI) outlet.
5. Activate Battery
One Lithium CR2032 battery (included) is required to retain the time and date during power loss. Annual replacement is recommended.
Remove the plastic strip to activate the pre-installed battery. (See page 12 for battery replacement)
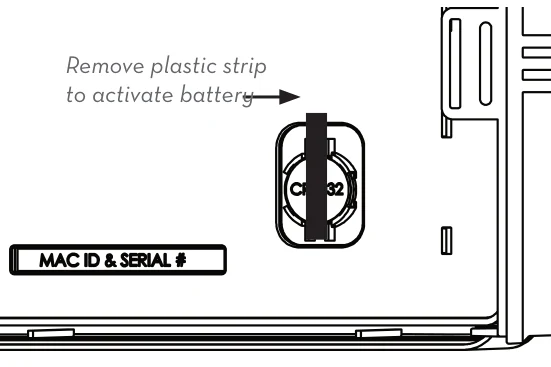
Note
Note: The battery alone will not operate the valves in your sprinkler system. The sprinkler timer has a built-in transformer that must be connected to an AC voltage source.
Section 3: Programming
A note about multiple programs
Your sprinkler timer provides the flexibility of using 3 independent programs (A,B,C). A program is where you store all of your sprinkler settings. It consists of a group of stations set to specific start times and run times. Multiple programs allow you to run different valves on different days with different run times. While many applications only require one program (A), using multiple programs can be useful for drip areas, newly planted lawn, or rotary sprinkler stations. Using programs to group stations with similar water needs will maximize irrigation efficiency.
Primary programming can be accomplished in just a few basic steps. The instructions here are for those who intend to use the timer without wifi connectivity. Otherwise, programming should be completed using the instructions included in the app.
Primary Programming
Press the Reset tab on the back of the swing panel to clear any previous factory programming.
1. Set Clock
2. Start Time
Note
Note: Only one start time is needed to run all of the zones in a program.
The display will show:
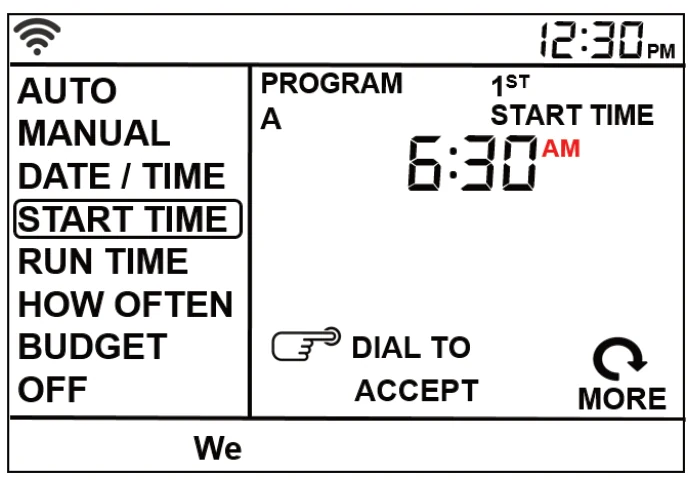
Please note that [START TIME] is the time of day that your programmed watering starts. You can set up to 4 start times. All stations that have a programmed run time (how long) will run in sequence at these times.
Note
Note: Start-Time Stacking: When a start time is set before the previous program has completed, that start time will be “stacked” or delayed, and will start upon completion of the previous program.
Example: Bill just planted new grass seed and wants to water three times per day. He sets START TIME 1 for 5am, START TIME 2 for 12pm, and START TIME 3 for 5 pm. He also sets HOW OFTEN to INT (interval) EVERY 1 DAYS (see section 3, HOW OFTEN). In AUTO mode the system will water 3 times per day. Once Bill’s sod is established he can CLEAR start times 2 and 3 and return to watering just once per day.
3. Run Time
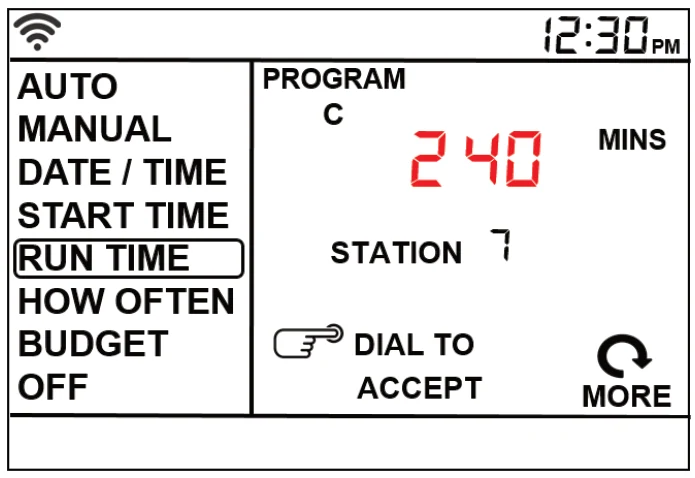
STATION is the area that will be watered by each valve. On this screen the RUN TIME or duration for each station is set.
Note
Note: Press the BACK button to return to the main lcd menu
4. How Often
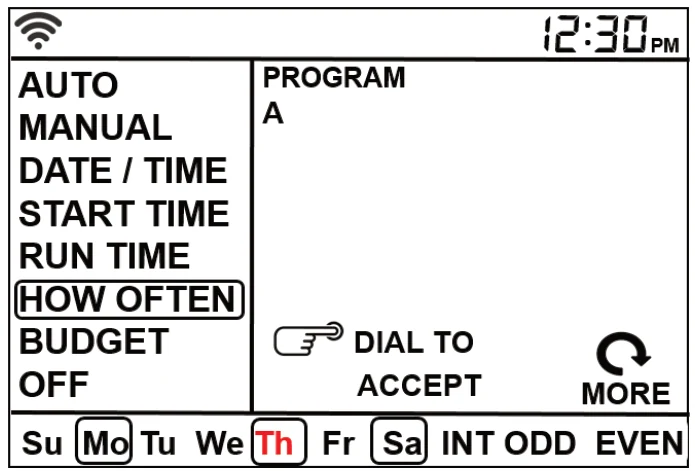
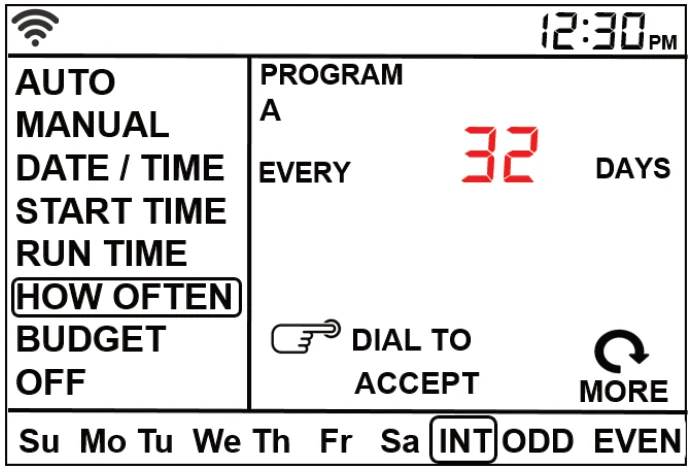
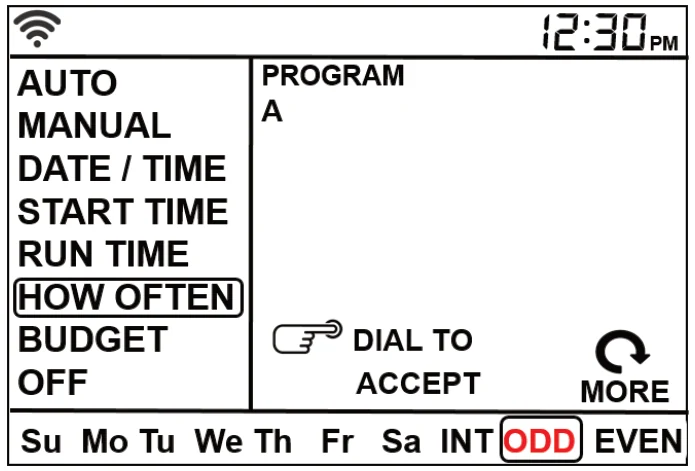
This screen allows you to set how often to water. There are 3 options provided:
- Days of the week (Mon, Tues, Wed, etc.)
- Intervals (Every “X” number of days)
- Odd or Even Days
Days of the Week
Example: Monday, Thursday, & Saturday
Intervals
Example: An interval of 1 will water every day; an interval of 3 will water every 3rd day, etc.
Odd or Even Days
Example: Odd: 1st, 3rd, 5th, etc.
Example: Even: 2nd, 4th, 6th, etc.
Note
Note: Selecting a different option or pressing clear will erase the previous selection.
Press Back to return to the main LCD menu, rotate the dial to Auto and press the dial to select. You have programmed your timer!
Note
Note: If your program is lost, the factory installed fail-safe program will turn on each station every day for 10 minutes
Note
Note: Your prior programming will not be disturbed unless altered. Always be aware of the program you are in (A, B, or C) when you are making changes.
Reviewing and Changing Your Program
If you want to review or change the start times, run times, or how often to water, simply follow the directions again for that option. After reviewing or changing a watering schedule, remember to turn the dial back to [AUTO] for automatic operation.
Section 4: Additional Features
Rain Delay
[Rain delay] allows you to delay your sprinkler timer from watering for a set period of time. Delay settings are 24, 48, and 72 hours.
- With the timer in AUTO.
- Press the [Rain Delay] button to automatically delay watering for 24 hours.
- If a longer Rain Delay is desired, rain delay button repeatedly or rotate the dial until the desired number of delayed days is reached.
- Press the dial to begin the rain delay.
- [CLEAR] button stops the rain delay and scheduled watering will resume.
- At the end of the selected rain delay amount of time, automatic watering resumes.
- While in rain delay mode, the timer will display the number of remaining rain delay days or hours.
Water Budgeting
Water Budgeting is a simple way to adjust your watering duration to match seasonal watering needs. Water Budgeting works by increasing or decreasing watering duration for all stations in each program.
Adjustment range is from 10% to 200% by increments of 10%. The default value is 100%, which means your timer will run each zone for exactly the number of minutes you entered as the run time. The budgeting will remain at the adjusted range until you change it.
To set budgeting:
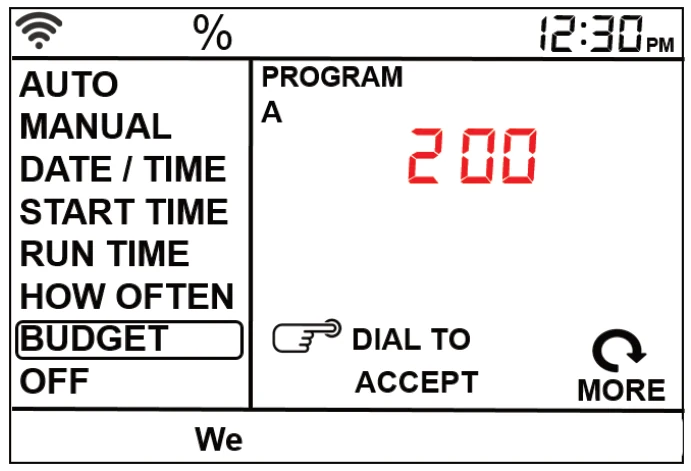
Example: Bill’s watering duration is set at 30 minutes however; it is summertime so he wants to water twice as long so he sets his budgeting to 200%, his timer will now water for 60 minutes.
Manual Watering
Your timer has the ability to allow you to manually water without disturbing the preset program.
Note
Note: More stations can be watered by repeating this same process
Example: To manually water on station 3 for five minutes, rotate the dial to [MANUAL] then press the dial. Rotate the dial until you see station 12, press the dial and rotate it until you see station 3, then press the dial. Rotate the dial until five minutes shows in the display then press the dial.
Note
Note: After the [MANUAL] button has been pushed, if a selection is not made within 5 seconds all stations and programs will begin watering using the programmed RUN TIMES. If no RUN TIMES have been set, nothing will happen and the display will return to the time of day.
Note
Note: If the run times have not been set, the timer will not initiate manual watering and the screen will return to the current time.
Connecting a Rain Sensor
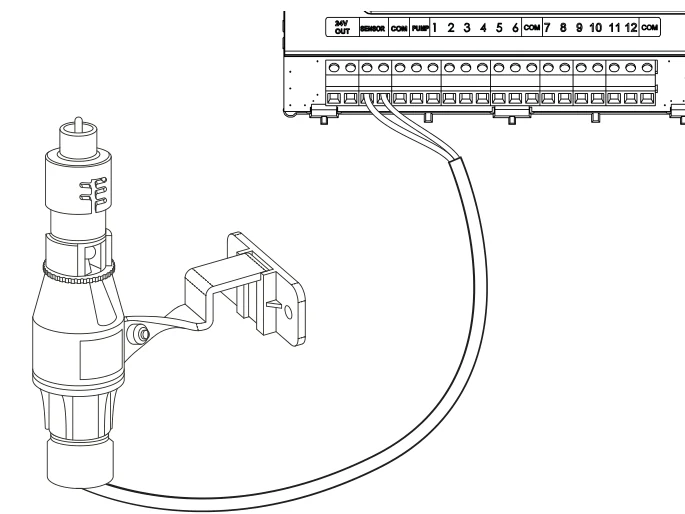
- Connect the rain sensor wires to the wiring terminal ports labeled “Sensor”.
- Place the sensor on/off switch to the “on” position to begin operation.
Note
Note: Refer to your rain sensor manual for specific wiring instructions.
Rain Sensor Bypass
This sprinkler timer is equipped with a sensor override “on/off” switch. This switch is for use during maintenance and repairs, so the sprinkler timer can be operated even if the rain sensor is in active mode.
Important
Important: If the rain sensor switch is in the “on” position and no sensor is connected, the sprinkler timer will not operate. To resume sprinkler timer operation place the switch in the off position.
Pump Start & Master Valve
This sprinkler timer allows a master valve or pump start relay to operate whenever a station is on.
Note
Note: If you are activating a pump from this timer, you must purchase a Pump Start Relay. From the pump start relay (or master valve); connect one wire to the “Pump” terminal and the other wire to the “Common” terminal.
Replacing the Battery
Warning
Warning: Risk of Fire, Explosion, and Electric Shock. Replace battery with Hitachi Maxell Ltd, Type CR2032 only. Use of a different battery has the potential for a risk of fire, explosion, and electric shock. See owners manual for instructions.
Timer requires a CR2032 Lithium battery.
- The battery will maintain your time and date in case of an AC power loss.
- Battery should last approximately one year.
- To remove, lift on the edge of the coin cell battery.
- Insert one CR2032 battery into the compartment with the + side up.
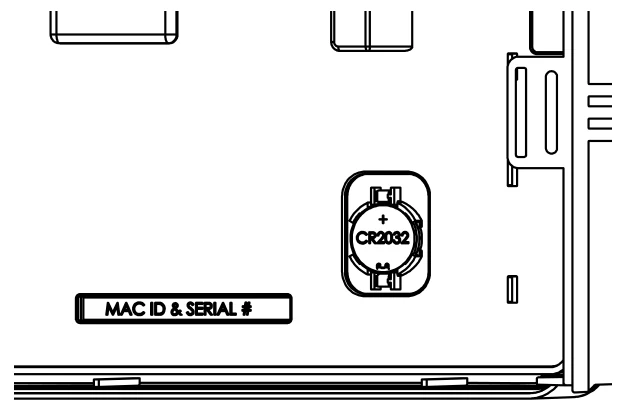
A weak or missing battery can cause the time and date to be erased after a power failure. If this happens, you will need to install a fully charged battery.
Tip
Tip: Replace battery every year, to avoid loss of programming
Note
Note: A battery alone will not operate the valves in your sprinkling system. The sprinkler timer has a built-in transformer that must be connected to an AC line voltage source.
Section 5: Reference
| Term | Definition |
|---|---|
| START TIME | The time the program begins watering the first programmed station. |
| VALVE | Supplies water to a specific station or area. The opening and closing of the valve is accomplished through electrical current supplied by the sprinkler timer. |
| MASTER VALVE | Typically located at the main water source. Turns on and off water for the entire irrigation system when not in use. |
| MULTIPLE START TIMES | A controller feature that allows a program to be operated multiple times on the same watering day. |
| OVERLAPPING PROGRAMS | When a “Start Time” is set for a program before the previous program has completed. |
| PROGRAM (A, B, OR C) | Individual programs as set by the user. Each program operates independently. If one program overlaps the other the programs will be “stacked.” After the first program finishes the next program will begin. |
| RAIN DELAY | A feature that postpones the running of a scheduled watering program for a specific duration. |
| SOLENOID | The electrical part on an irrigation valve that opens and closes the valve. |
| SPRINKLER TIMER | A device which instructs the station valves to operate. |
| STATION | A grouping of sprinklers operated by a single valve which is controlled by the timer. |
| WATERING BUDGETING | Adjusts your overall watering program as a percentage of total watering duration. |
Troubleshooting
| Problem | Possible cause |
|---|---|
| One or more valves do not turn on | 1. Faulty solenoid connection 2. Wire damaged or severed 3. Flow control stem screwed down, shutting valve off 4. Programming is incorrect |
| Stations turn on when they are not supposed to | 1. Water pressure is too high 2. More than one start time is programmed 3. AM/PM is incorrect |
| One station is stuck on and will not shut off | 1. Faulty valve 2. Particles of dirt or debris stuck in valve 3. Valve diaphragm faulty |
| All valves do not turn on | 1. Transformer defective or not connected 2. Programming is incorrect |
| Timer will not power up | 1. Transformer not plugged into a working outlet |
| Valves continue to turn on and off when they are not programmed | 1. More than one start time is programmed with overlapping schedules 2. Excessive pressure |
Help
- 1-800-488-6156 or 1-801-299-5555
- www.orbitonline.com
Before returning this sprinkler timer to the store, contact Orbit® Technical Service at: 1-800-488-6156, 1-801-299-5555
Listings
The sprinkler timer is tested to UL-50 standard & is ETL® listed.
Disconnection : Type 1Y
Normal Pollution Situation.
The supply cord of this control can be replaced only by the manufacturer or his accredited service agent.
Trademark Notice
WaterMaster® is a registered trademark of Orbit® Irrigation Products, Inc. The information in this manual is primarily intended for the user who will establish a watering schedule and enter that schedule into the sprinkler timer. This product is intended to be used as an automatic sprinkler timer for activating 24 VAC irrigation valves, as described in this manual.
Warranty and Statement
Orbit® Irrigation Products, Inc. warrants to its customers that its products will be free from defects in materials and workmanship for a period of six years from the date of purchase.
We will replace, free of charge, the defective part or parts found to be defective under normal use and service for a period of up to six years after purchase (proof of purchase required).
We reserve the right to inspect the defective part prior to replacement.
Orbit® Irrigation Products, Inc. will not be responsible for consequential or incidental cost or damage caused by the product failure. Orbit® liability under this warranty is limited solely to the replacement or repair of defective parts.
To exercise your warranty, return the unit to your dealer with a copy of the sales receipt.
This device complies with Part 15 of the FCC Rules. Operation is subject to the following two conditions: (1) This device may not cause harmful interference, and (2) This device must accept any interference received, including interference that may cause undesired operation.
Warning
Warning: Changes or modifications to this unit not expressly approved by the party responsible for compliance could void the user’s authority to operate the equipment.
Note
Note: This equipment has been tested and found to comply with the limits for a Class B digital device, pursuant to Part 15 of the FCC Rules. These limits are designed to provide reasonable protection against harmful interference in a residential installation. This equipment generates, uses and can radiate radio frequency energy and, if not installed and used in accordance with the instructions, may cause harmful interference to radio communications. However, there is no guarantee that interference will not occur in a particular installation.
If this equipment does cause harmful interference to radio or television reception, which can be determined by turning the equipment off and on, the user is encouraged to try to correct the interference by one or more of the following measures:
- Reorient or relocate the receiving antenna.
- Increase the separation between the equipment and receiver.
- Connect the equipment into an outlet on a circuit different from that to which the receiver is connected.
- Consult the dealer or an experienced radio/TV technician for help.
Caution
Caution: This appliance is not intended for use by young children or infirm persons without supervision. Young children should be supervised to ensure that they do not play with the appliance.
Related pages
B-hyve 57946 Smart Wi-Fi Sprinkler Timer Quick Start Guide
Unpack, mount, wire and connect the Orbit® B-hyve™ 57946 Smart WiFi Sprinkler Timer, then pair it with the B-hyve™ app over Wi-Fi.
B-hyve 57950 Smart Wi-Fi Sprinkler Timer User Manual
Orbit® B-hyve™ user manual for the 57950 smart Wi-Fi sprinkler timer, covering box contents, installation, Wi-Fi pairing, app controls, dial programming, LCD status, manual operation, and support.