 Документация
B-hyve WT24E Smart Wi-Fi Indoor Sprinkler Controller: краткое руководство
Краткое руководство по B-hyve WT24E Smart Wi-Fi Indoor Sprinkler Controller: настройка на английском и испанском, подключение клапанов, сопряжение по Wi-Fi и характеристики.
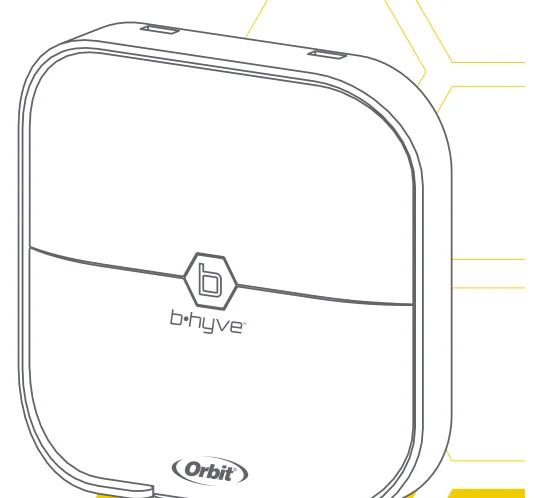
SMART WI-FI
INDOOR SPRINKLER CONTROLLER
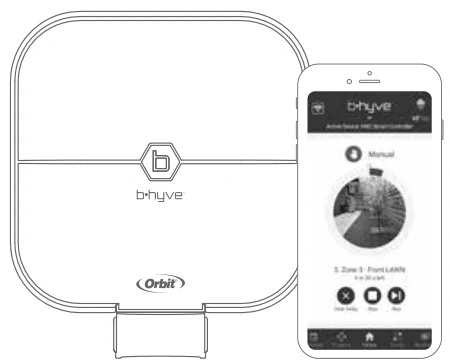
Compatible with other B-hyve® products
Quick Start Guide
English · Español
MODEL NO. WT24E
PART NO. 54915S, 54915M, 57915, 94915, 94925, 96915, 96925
Need Help?
If you encounter a problem, please use the following resources before retuning your B-hyve to the store.
Scan the QR Code for access to a full user manual, videos, and more.
 Call us 1-800-488-6156 ·
 Text us 801-797-2319
or visit us at:

Contents in the Box
- Wi-Fi Indoor Sprinkler Controller
- Screwdriver
- Mounting Screws and Anchors
- Transformer
- Quick Start Guide
- Conduit Cover
EU & UKCA Declaration of Conformity
Orbit Irrigation Products, LLC
915 N. Overland Rd., North Salt Lake, UT 84054 USA
Declares under our sole responsibility, that the product:
B-hyve® Smart Wi-Fi Indoor Sprinkler Controller
Complies with the following:
European Directives 2014/53/EU and UKCA Radio Equipment Regulations 2017, SI 2017:1206 (as amended by SI 2019:696) with reference to the following standards:
- IEC (EN) 60730-1:2013
- IEC (EN) 60730-2-7:2010
- BS EN & EN 50663:2017
- EN 301 489-1 V2.2.3
- EN 301 489-17 V3.2.4
- BS EN & EN 55032:2015/A11:2020
- BS EN & EN 61000-3-3:2013+A1:2019
- BS EN 55035:2017/A11:2020
- EN 300 328 V2.2.2
IFETEL: 11858C0221
FCC and IC Statement
This device complies with Part 15 of the FCC Rules and Industry Canada license exempt RSS standards. Operation is subject to the following two conditions: (1) This device may not cause harmful interference, and (2) this device must accept any interference received, including interference that may cause undesired operation.
FCC Warning
Any changes or modifications not expressly approved by the party responsible for compliance could void the user's authority to operate this equipment.
Note
This equipment has been tested and found to comply with the limits for a Class B digital device, pursuant to Part 15 of the FCC Rules. These limits are designed to provide reasonable protection against harmful interference in a residential installation. This equipment generates, uses, and can radiate radio frequency energy and, if not installed and used in accordance with the instructions, may cause harmful interference to radio communications. However, there is no guarantee that interference will not occur in a particular installation. If this equipment does cause harmful interference to radio or television reception, which can be determined by turning the equipment off and on, the user is encouraged to try to correct the interference by one of the following measures:
- Reorient or relocate the receiving antenna.
- Increase the separation between the equipment and the receiver.
- Connect the equipment into an outlet on a circuit different from that to which the receiver is connected.
- Consult the dealer or an experienced radio/TV technician for help.
This device meets the FCC and IC requirements for RF exposure in public or controlled environments. The end user is advised to maintain a distance of 20 cm from the controller and any personnel to ensure compliance with RF exposure regulations.
This Class B digital apparatus complies with Canadian ICES-003.
The B-hyve® App
Install the B-hyve® app on your smart device.
You will need a smart device to connect the controller to Wi-Fi.
Note
The app will guide you through initial set up of your sprinkler controller. In addition, there are help icons throughout the app with more information and useful tips.
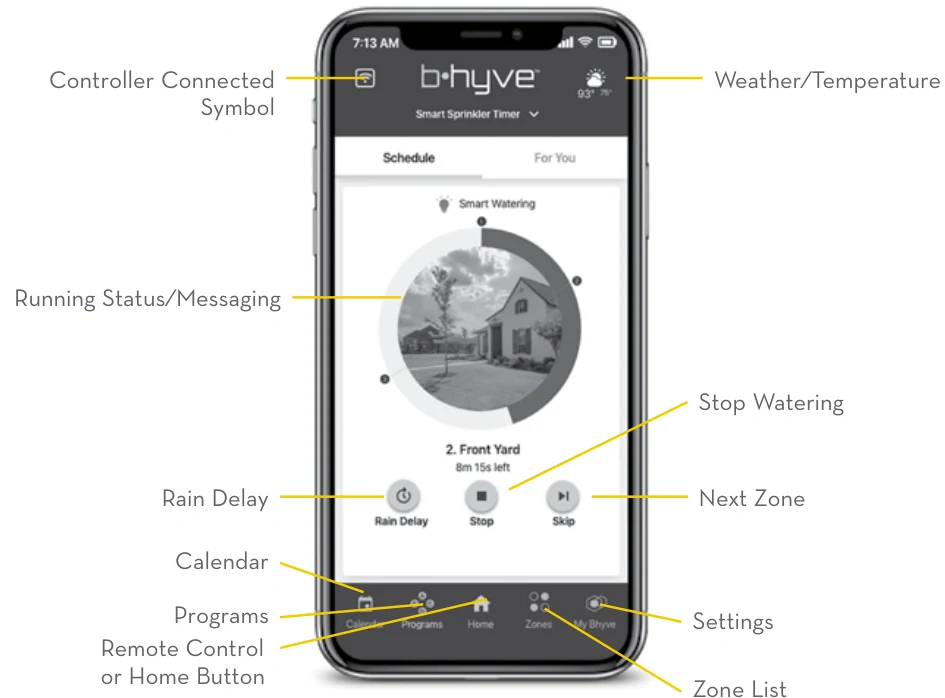
- Controller Connected Symbol
- Weather/Temperature Symbol
- Running Status/Messaging
- Stop Watering
- Rain Delay
- Next Zone
- Calendar
- Programs
- Remote Control or Home Button
- Zone List
- Settings
Controller Installation
Select a location
Choose a location near power and away from direct sunlight, if possible. This location should also have a good Wi-Fi signal. You can check this using a smart phone. (Find a location that has a minimum of two bars.)
Note
If replacing a controller, it is helpful to take a photo of the wires before you remove them from the old controller.
Mount the controller
Install a screw (included) into the wall. Use the expanding anchors (included) for plaster, masonry or drywall installations. Hang the controller on the installed screw using the keyhole slot. Level the controller and use the second screw in one of the preformed mounting holes to secure the controller.
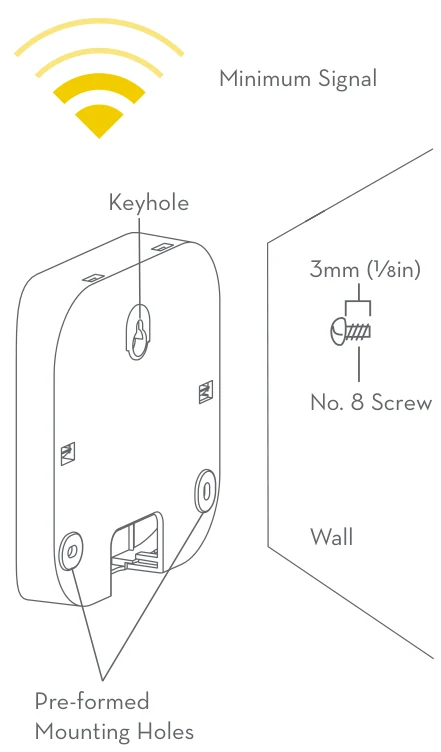
- Minimum Signal
- Keyhole
- 3mm (1/8in)
- No. 8 Screw
- Wall
- Pre-formed Mounting Holes
Connect Valve Wires
Prepare wire
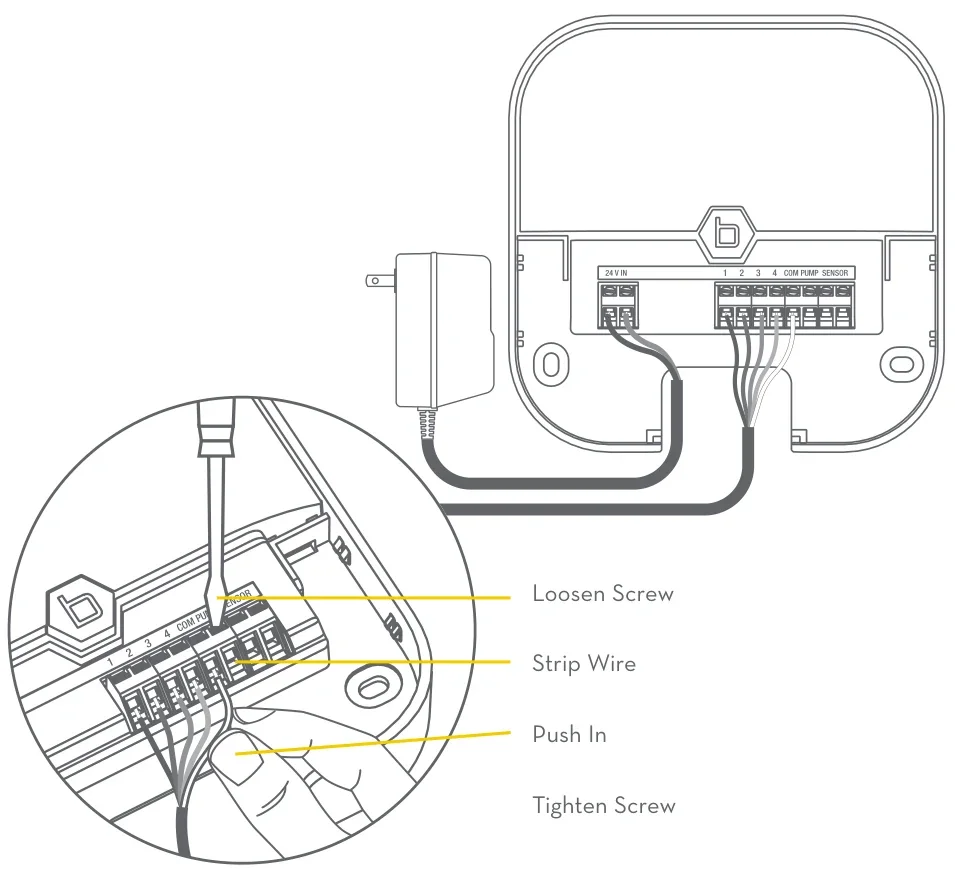
Strip 13mm (1/2in) of insulation from each wire.
Connect wires
Attach one wire from each valve to a Common (COM) wire and the other wires to a numbered terminal (only one wire per terminal).
- Loosen Screw
- Strip Wire
- Push In
- Tighten Screw
Controller Installation–Connecting to Wi-Fi
Plug in your Orbit® B-hyve® controller
Once your B-hyve® controller is plugged into the power source, it will automatically look to pair with your smart device. The  will begin to blink blue. This indicates that your controller is ready to pair with your smart device. Ensure that your smart device has Bluetooth® turned on.
Connect to your Orbit® B-hyve® controller
Open your B-hyve® app, create an account or login, and follow the step-by-step process to add and set up your device. The B-hyve® app will connect to your device and you will, then, be guided to connect to your home Wi-Fi network.
Connect to your Wi-Fi network
Select your network from the list and enter the password for the network to connect your controller to your Wi-Fi signal. When connected, the will illuminate solid white indicating a successful pairing.
Note
If you do not see your network name in the list, tap the refresh button in the app. If your network name still does not appear, tap Advanced in the app and enter your network name and password. This device will only connect through 2.4 GHz Wi-Fi networks. 5.0 GHz networks are not supported and will not appear in your app.
Note
FOR OPTIMUM CONTROLLER PERFORMANCE, CONNECT TO WI-FI TO RECEIVE THE LATEST CONTROLLER UPDATES.
Programming and Operation
Programming the controller
The app has help screens and video to assist you with Wi-Fi connections, programming, smart watering and other general questions you may have.
Note
Your programmed schedules are stored both in the app and on the controller. Watering will continue, if Wi-Fi connection is lost.
Manual Operation
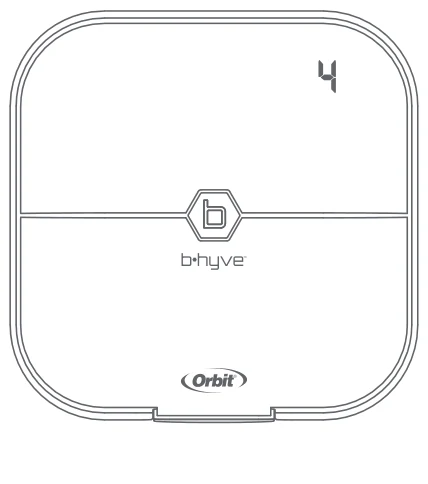
All programming and full functionality of the controller are available in the B-hyve® app. If you have the need, there are some basic operations you can perform directly at your controller.
| Function | Button Press |
|---|---|
| MANUAL WATERING | Hold the button until  (water ALL stations) appears, then release. Quickly press the button again until the desired station appears. Default watering is 10 min. per station. |
| CANCEL STATION | Press the button once to cancel the current station. |
| RAIN DELAY | Set in app; the rain delay icon blinks yellow and  appears. |
| ON/OFF | Hold the button for 10 sec. until the turns white. |
| HARD RESET | Quickly press the button 5 times. |
Temporizador de aspersor inteligente para interior con conexión Wi-Fi
Compatible con otros productos B-hyve®
Guía de inicio rápido
Model No. WT24E
Part No. 57915, 57915S, 57915M
IFETEL: 11858C0221

La operación de este equipo esta sujeta a las siguientes dos condiciones: (1) es posible que este equipo o dispositivo no cause interferencia perjudicial y (2) este equipo o dispositivo debe aceptar cualquier interferencia, incluyendo la que pueda causar su operación no deseada.
Contenido de la caja
- Temporizador de aspersor para interior con conexión Wi-Fi
- Destornillador
- Tornillos y tarugos de montaje
- Transformador
- Guía de inicio rápido
- Cubierta de conducto
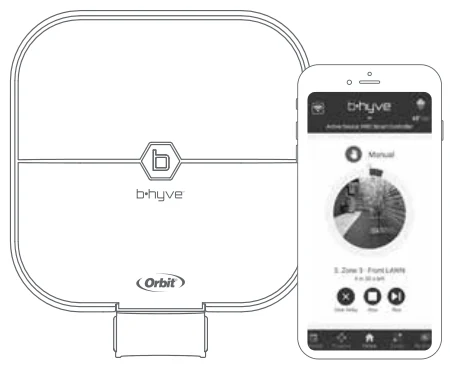
La aplicación B-hyve®
Instale la aplicación B-hyve® en su dispositivo inteligente.
Necesitará un dispositivo inteligente para conectar el temporizador a Wi-Fi.
Nota
La aplicación le guiará a través de la configuración inicial de su temporizador de aspersor. Además, dispone de iconos de ayuda por toda la aplicación con más información y consejos útiles.
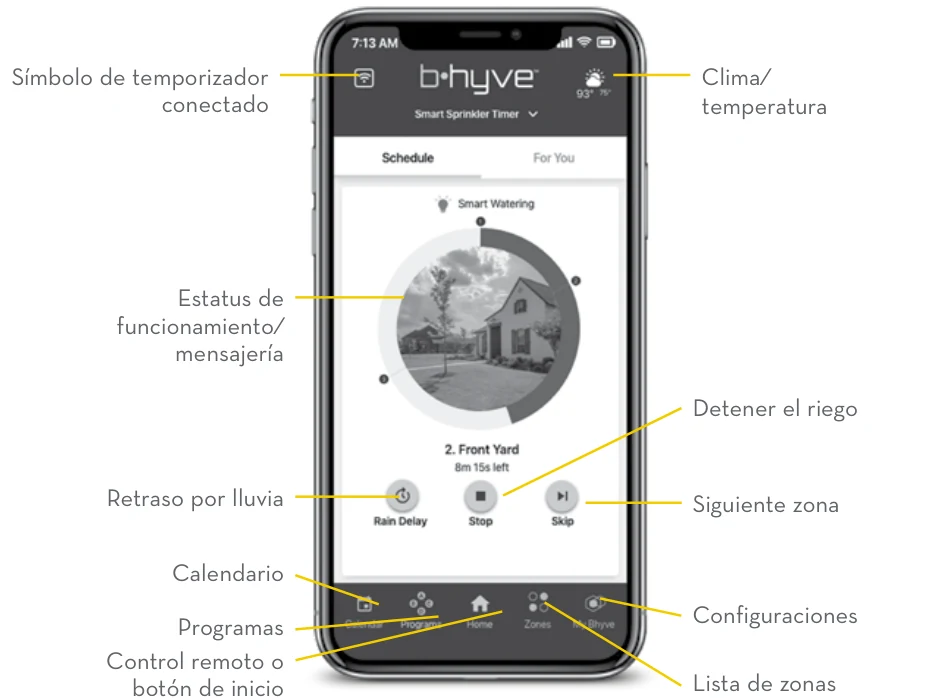
- Símbolo de temporizador conectado
- Clima/temperatura
- Estatus de funcionamiento/mensajería
- Detener el riego
- Retraso por lluvia
- Siguiente zona
- Calendario
- Programas
- Control remoto o botón de inicio
- Lista de zonas
- Configuraciones
Instalación del temporizador
Seleccione una ubicación
Elija una ubicación cerca de la electricidad y alejada de la luz solar directa, si fuese posible. Esta ubicación también debe contar con una buena señal Wi-Fi. Puede revisar esto utilizando su teléfono inteligente. (Encuentre una ubicación que tenga un mínimo de dos barras.)
Nota
Si reemplaza un temporizador, es útil tomar una foto de los cables antes de retirarlos del temporizador actual.
Montaje del temporizador
Instale un tornillo (se incluye) en la pared. Utilice los tarugos de expansión (se incluyen) de instalaciones en yeso, mampostería o panel de yeso. Cuelgue el temporizador en el tornillo instalado utilizando la ranura de la bocallave. Nivele el temporizador y utilice el segundo tornillo en uno de los agujeros preformados de montaje para asegurar el temporizador.
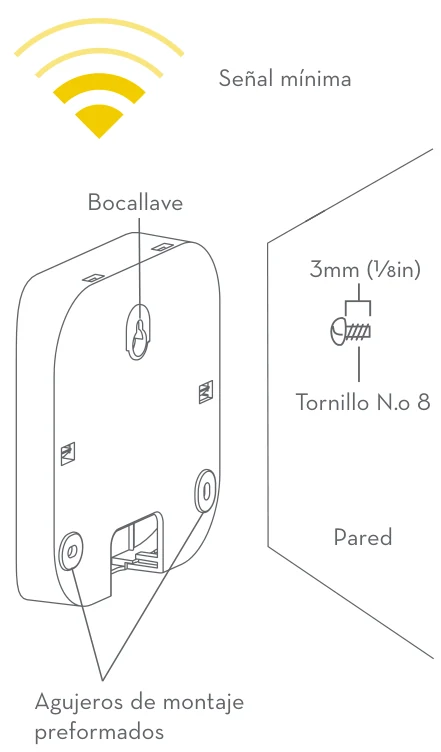
- Señal mínima
- Bocallave
- 3mm (1/8in)
- Tornillo N.o 8
- Pared
- Agujeros de montaje preformados
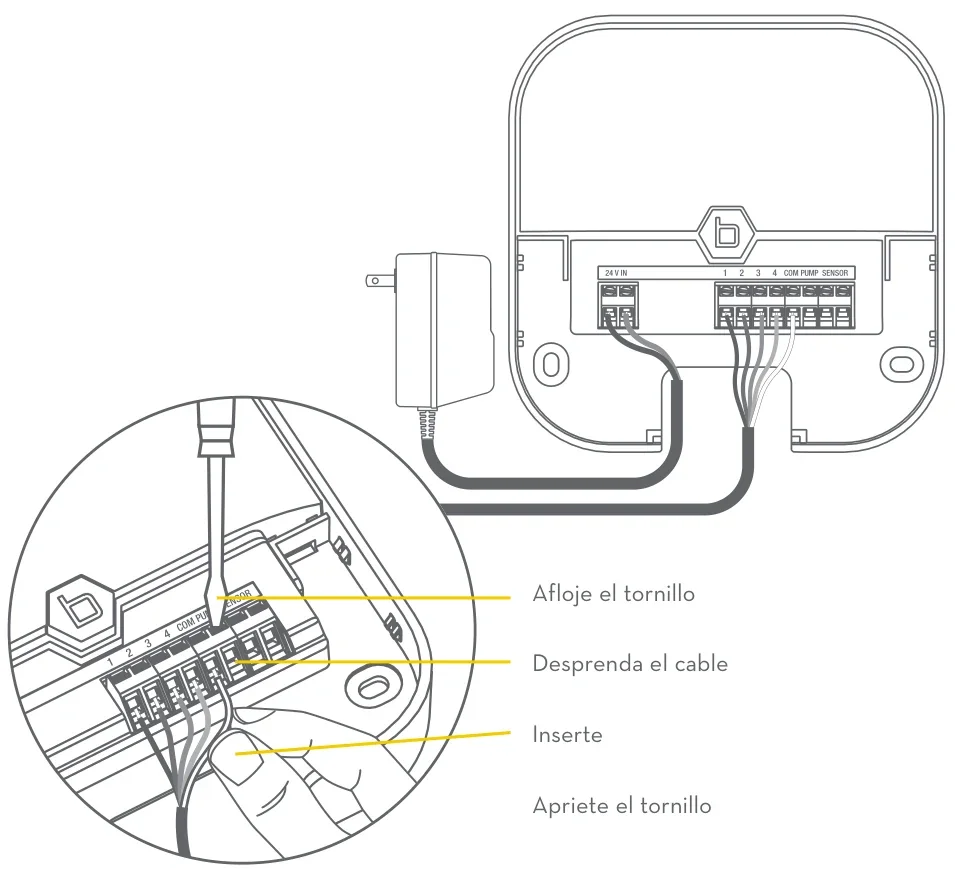
Conecte los cables de las válvulas
Prepare el cable
Desprenda 13mm (1/2in) del aislamiento de cada cable.
Conecte los cables
Fije un cable de cada válvula a un cable “común” (COM) y los otros cables a un terminal numerado (solo un cable por terminal).
- Afloje el tornillo
- Desprenda el cable
- Inserte
- Apriete el tornillo
Instalación del temporizador: Conexión a la Wi-Fi
Conecte su temporizador Orbit® B-hyve®
Una vez que su temporizador B-hyve® esté conectado en el tomacorriente, buscará conectarse automáticamente con su dispositivo inteligente. El comenzará a destellar en azul. Esto indica que su temporizador está listo para conectarse con su dispositivo inteligente. Compruebe que su dispositivo inteligente tenga el Bluetooth® activado.
Conexión a su temporizador Orbit® B-hyve®
Abra su aplicación B-hyve®, cree una cuenta o ingrese al sistema y siga el proceso paso por paso para añadir y configurar su dispositivo. La aplicación B-hyve® se conectará a su dispositivo y luego será guiado para conectarse a la red Wi-Fi de su hogar.
Conexión a su red Wi-Fi
Seleccione su red de la lista e ingrese la contraseña para conectar su temporizador a su señal Wi-Fi. Cuando esté conectado, el se iluminará en blanco fijo indicando una conexión exitosa.
Nota
Si usted no ve el nombre de su red en la lista, toque el botón de refrescar en la aplicación. Si el nombre de su red no aparece, toque Advanced (Avanzado) en la aplicación e introduzca el nombre y clave de su red. Este dispositivo solo se conecta a través de redes Wi-Fi de 2.4 GHz. Las redes de 5.0 GHz no están soportadas y no aparecerán en su aplicación.
Nota
PARA MÁXIMO RENDIMIENTO DEL TEMPORIZADOR, CONECTE A WI-FI PARA RECIBIR LAS ACTUALIZACIONES MÁS RECIENTES DEL TEMPORIZADOR.
Programación y funcionamiento
Programación del temporizador
La aplicación tiene pantallas de ayuda y video para asistirle con las conexiones a Wi-Fi, la programación, el riego inteligente y otras preguntas generales que pueda tener.
Nota
Sus itinerarios de programación están almacenados tanto en la aplicación como en el temporizador. El riego continuará si se pierde la conexión a Wi-Fi.
Funcionamiento manual
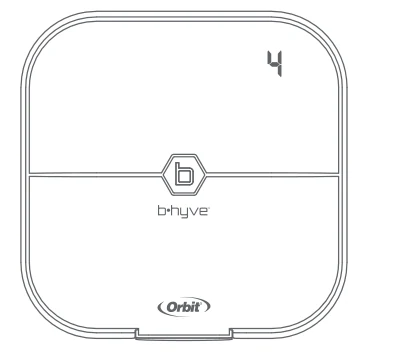
Toda la programación y funcionalidad completa del temporizador están disponibles en la aplicación B-hyve®. Si lo necesita, hay varias funciones básicas que puede realizar directamente en su temporizador.
| Función | Botón pulsador |
|---|---|
| RIEGO MANUAL | Oprima el hasta que aparezca el (regar TODAS las estaciones), y seguidamente suéltelo. Presione rápidamente el de nuevo hasta que aparezca la estación deseada. El riego preconfigurado es 10 minutos por estación. |
| CANCELAR ESTACIÓN | Presione el una vez para cancelar la estación actual. |
| RETRASO POR LLUVIA | Configure la aplicación; el destella en amarillo y el aparece. |
| ENCENDIDO/APAGADO | Sostenga el durante 10 segundos hasta que el se torne blanco. |
| REINICIO COMPLETO | Presione rápidamente el 5 veces. |
Especificaciones
Potencia del temporizador:
Entrada/Salida:
- Argentina, Australia, Chile, Europa, Perú—26V CA 750 mA 50/60 ciclos
- EE. UU.—24V CA 750 mA 60Hz
Potencia del transformador:
Entrada:
- Argentina: 230V AC 50Hz 23W
- Australia: 240V CA 50/60Hz 23W
- Chile: 220V AC 50Hz 23W
- Europa: 230V CA 50/60Hz 23W
- Perú: 220V AC 50/60Hz 23W
- EE. UU.: 120V CA 60Hz 23W
Salida: 24V 750 mA
Rango de funcionamiento de temperatura del temporizador:
- En funcionamiento: 0–70°C (32-158°F)
- Almacenamiento y transporte: -20–80°C (-4–176°F)
Rango de funcionamiento de humedad del temporizador:
- En funcionamiento: 0–80%
- Almacenamiento y transporte: 0-90%
Altitud: 2000m (6500ft)
Especificaciones de radiofrecuencia:
- Tecnologías: Bluetooth® / Wi-Fi
- Frecuencias: 2402 - 2480 MHz
- EIRP: BT (8.9mW), Wi-Fi (114.29mW)
Instalación clase II
Sobrevoltaje categoría II
Este temporizador trabaja con cualquier solenoide de irrigación estándar de 24 V. El fusible interno no es reemplazable.
Este producto no se debe mezclar con los residuos domésticos generals. Para el tratamiento adecuado, recuperación y reciclaje, las normativas locales exigen que lleve este(estos) producto(s) a los puntos de recolección designados donde serán reciclados sin cargo alguno.
Ayuda
www.orbitonline.com | community.orbitonline.com
Orbit Irrigation Products, LLC
North Salt Lake, UT 84054 USA
orbitonline.com
© 2021 Orbit Irrigation Products, LLC
См. также: Краткое руководство по внутреннему контроллеру B-hyve · Программы, время запуска, цикл и выдержка
B-hyve Smart Wi-Fi Indoor Sprinkler Timer: краткое руководство
Краткое руководство по B-hyve Smart Wi-Fi Indoor Sprinkler Timer: комплект поставки, приложение B-hyve, монтаж на стену, подключение клапанов, сопряжение по Wi-Fi и характеристики.
B-hyve XR 57985 smart Wi-Fi таймер полива: руководство пользователя
Печатное руководство пользователя B-hyve XR 57985: выбор места установки, подключение клапанов, сопряжение по Wi-Fi, ручное управление, технические характеристики и заявление FCC.